Cloudeka
  • Service Portal Cloudeka
  • Starter Guide Deka Flexi
  • Introduction
    • Sign Up
    • Sign In
    • Sign Out
    • Forgot Password
    • Project
      • Create a New Project
      • List Service
      • Delete Project
    • Profile Setting
    • Organization
      • Manage Role Organization
      • Setting Organization
    • Check Audit Log
    • Broadcast
    • Voucher
      • Voucher Trial
      • Voucher Credit
      • Voucher Discount
  • Deka Flexi
    • Deka Flexi: Instance
      • Introduction
      • Machine Type
      • Operating Systems
      • Server Group
        • Create Server Group
        • Detail Server Group
        • Delete Server Group
      • Create a VM Instance
      • Details Instance
        • Deka Agent
        • Power On Instance
        • Power Off Instance
        • Reboot Instance
        • Resize Instance
        • Resize Root Disk
        • Attach Interface
        • Detach Interface
      • Connect to VM Instance
        • Connect to VM Instance via Cloudeka Portal
        • Connect to Windows VM Instance via RDP (Remote Desktop)
        • Connect to Linux VM Instance via SSH
        • Connect to Linux VM Instance via SSH Key
      • Create SSH Keys
      • Delete VM Instance
    • Deka Volume: Storage
      • Creating & Attaching a Storage or Disk
      • Formatting a Disk
        • Formatting & mounting a disk on Windows
        • Formating & mounting a disk on Linux
      • Increase Storage
      • Delete Storage
    • Deka Volume: Images
      • Snapshot
        • Take a Snapshot for Instance
        • Restore a snapshot for Instance
        • Delete a snapshot for Instance
        • Take a snapshot for Storage
        • Delete a snapshot for Storage
      • Backups
      • Custom Image
    • Deka Flexi: Network
      • VPC Network
        • Create VPC Network
        • Edit VPC Network
        • Add/EditPort
        • Delete Port
        • Add/Edit Subnet
        • Delete Subnet
        • Delete VPC Network
      • Floating IP
        • Assign Floating IP
        • Unassign Floating IP
        • Reassign Floating IP
        • Delete Floating IP
    • Deka Flexi: Security
      • Security Firewall Rule
      • Edit Security Firewall Rule
      • Delete Security Firewall Rule
    • Deka SLB
      • Create Load Balancer
      • Configuration Deka SLB
      • Delete Load Balancer
      • Example Use Case
    • Deka VPN
      • Create VPN
      • OpenVPN Configuration
        • Create OpenVPN
        • Add OpenVPN User
        • Edit OpenVPN User Configuration
        • Download OpenVPN
        • Install OpenVPN on Windows
        • Install OpenVPN on MacOS
        • Connection with OpenVPN
        • Delete OpenVPN User
        • Delete OpenVPN
      • IPsec Configuration
        • Create IPsec
        • Connect IPsec
        • View Pre Shared Key
        • Disconnect IPsec
        • Delete IPsec
      • Remote Instance using Putty
      • Delete VPN
    • NAT Gateway
      • Create NAT Gateway
      • Configuration NAT Gateway
        • Add Floating IP
        • Delete Floating IP
        • Add Static Route
        • Delete Static Route
        • Add NAT
        • Delete NAT
      • Remote Instance
        • Create VPC Expert
        • Create Instance
        • Floating IP Configuration
        • Virtual Machine Access Internet
        • Remote Virtual Machine using Computer Terminal
      • Remote Putty
        • Create VPC
        • Configuration Interface
        • Configuration NAT Gateway
        • Configuration Firewall
        • Remote Instance using Putty
      • Delete NAT Gateway
    • Deka Agent
      • Install Deka Agent on Linux
      • Detail Deka Agent
        • Quick CPU / Mem / Disk
        • Basic CPU/ Mem/ NET/ Disk
        • Memory Meminfo
        • Memory Vmstat
        • System Timesync
        • System Processes
        • System Misc
        • Hardware Misc
        • Systemd
        • Storage Disk
        • Storage Filesystem
        • Network Traffic
        • Network Sockstat
        • Network Netstat
        • Node Exporter
      • Export to PDF
      • Monitoring Deka Agent
    • Deka GLB
      • Create Deka GLB
      • Configuration Deka GLB
      • Delete Deka GLB
      • Example Use Case
  • Deka Prime
    • Introduction
    • NSX-T & NSX-V
    • Delete Project
    • Menu Instance
      • Create New Instance
      • Access Console Instance
      • Power On Instance
      • Power Off Instance
      • Detail Instance
      • Configuration NICs
      • Configuration Guest OS
    • Menu Network
      • Create Routed Network
      • Create Isolated Network
      • Edit Network
      • Delete Network
    • Menu Security
      • Firewall
      • NAT
      • Routing
      • IP Set
    • Menu Catalog
    • Configuration Deka Flexi
  • Storage
    • Deka Box
      • Create Deka Box
      • Overview Deka Box
      • Resize Deka Box
      • Managing Deka Box Access Key
      • Access Deka Box using S3 Browser
      • Upload files and folders in S3
      • Enable versioning in S3
      • Create Static Web in S3
      • Delete Deka Box
      • Bucket and Group Access Policies
        • Specify permissions
        • Edit S3 Bucket Policies
    • Deka NFS
      • Create Deka NFS
      • Detail Deka NFS
      • Mount Deka NFS in Instance
      • Unmount Deka NFS in Instance
      • Delete Deka NFS
  • Network
    • Deka CDN
      • Create CDN
      • Location Configuration CDN
      • Configuration CDN via Editor
      • Deploy CDN
      • Renewal SSL
      • Delete CDN
    • Deka DNS
      • Create DNS
      • Setting DNS Management
      • Delete DNS
  • Platform
    • Deka Dbaas
      • Create Data Store
      • Data Store Detail
      • Delete Data Store
      • Database Access Using Other Apps
    • Deka Rock
      • Create Deka ROCK
      • Detail Deka ROCK
      • Machine Set
      • Security Group
      • Maintenance Windows
      • Open Console with Openshift
      • Installing CLI (oc) on Computer
      • Destroy Cluster Deka ROCK
    • Deka Harbor
      • Create Deka Harbor
      • Detail Deka Harbor
      • Configuration Worker
      • Configuration Load Balancer
      • Configuration Inbound Rule
      • Kubernetes Dashboard
      • Delete Deka Harbor
  • Security
    • Deka AST
      • Create Project
      • Scan Project
      • Change Setting Project
      • SAST
      • SAST Issue
      • SAST: Measure Code
      • SAST: Custom Rule
      • SAST: Security Detector
      • SCA
      • Secret Key
      • Repo Missconfiguration
      • Scan Validation AppSec
      • Dynamic Security
      • Integration
      • Report
      • Delete Project
    • Deka SSL
      • Create Deka SSL
      • Download Key SSL
      • Renewal SSL
      • Import SSL
      • Delete SSL
  • CI/CD
    • Deka Registry
      • Create Deka Registry
      • Summary
      • Repositories
      • Logs
      • Labels
      • Tag
      • Member
      • Push
      • Resize
      • Delete Deka Registry
  • Software
    • Deka POP
      • Introduction
      • Detail Deka Pop
  • Monitoring
    • Alerting
      • Create Alert
      • Edit Alert
      • Delete Alert
      • Alerting Tes Implementation
    • Deka Agent
  • Support
    • Support Ticketing
      • Create Ticket
      • Ticket Details
    • Deka Manage Service
      • Bought a Manage Service Package
      • Downgrage/Upgrade Package
      • Unsubscribe Package
  • Billing
    • Check Billing
    • Balance
      • Billing Payment type Postpaid Project
      • Billing Payment type Prepaid Project
  • Miscellaneous
    • NTP Server
    • How to Sync Local and Remote Directories with Rsync
  • Deka GPU
Powered by GitBook
On this page
  1. Deka Flexi
  2. NAT Gateway
  3. Remote Putty

Configuration Interface

PreviousCreate VPCNextConfiguration NAT Gateway

Last updated 2 months ago

For the next step, configure the IP address that a virtual machine uses on a Linux system through console access in the Cloudka portal service. Before accessing the virtual machine console, first add the VPC used on each virtual machine. If initiated on a demo-ubuntu virtual machine using a VPC type simple, add the VPC interface of the type expert used in demo-ubuntu2, and on a demo-ubuntu virtual machine that previously used a VPC type experiment add the VPC interface of the demo-ubuntu virtual machine. To add a VPC interface to a virtual machine, on the Instances page of the Cloud services portal press the More key select Attach Interface.

Configuration Interface

In the Type column select by VPC, the VPC column select a different VPC from the VPC configuration that the virtual machine had previously used. Enter the IP address according to the subnet used on the VPC, and ensure that it does not use the IP address already in use. Because the previous configuration IP address 17.16.10.1 was already used for the Gateway IP, and the IP address 17.16.10.157 was used for the demo-ubuntu virtual machine. So the available IP addresses range from 17.16.102 to 17.16.10.156, and 17.16.10.158 to 17.16.10.254. Press the Create key to continue adding the VPC to the virtual machine.

Configuration Interface

To view recently added VPC interfaces installed on a demo-ubuntu virtual machine by pressing the See all IP Address button.

Do the same steps as above on the demo-ubuntu virtual machine. So on the demo-ubuntu virtual machine the IP address is used.

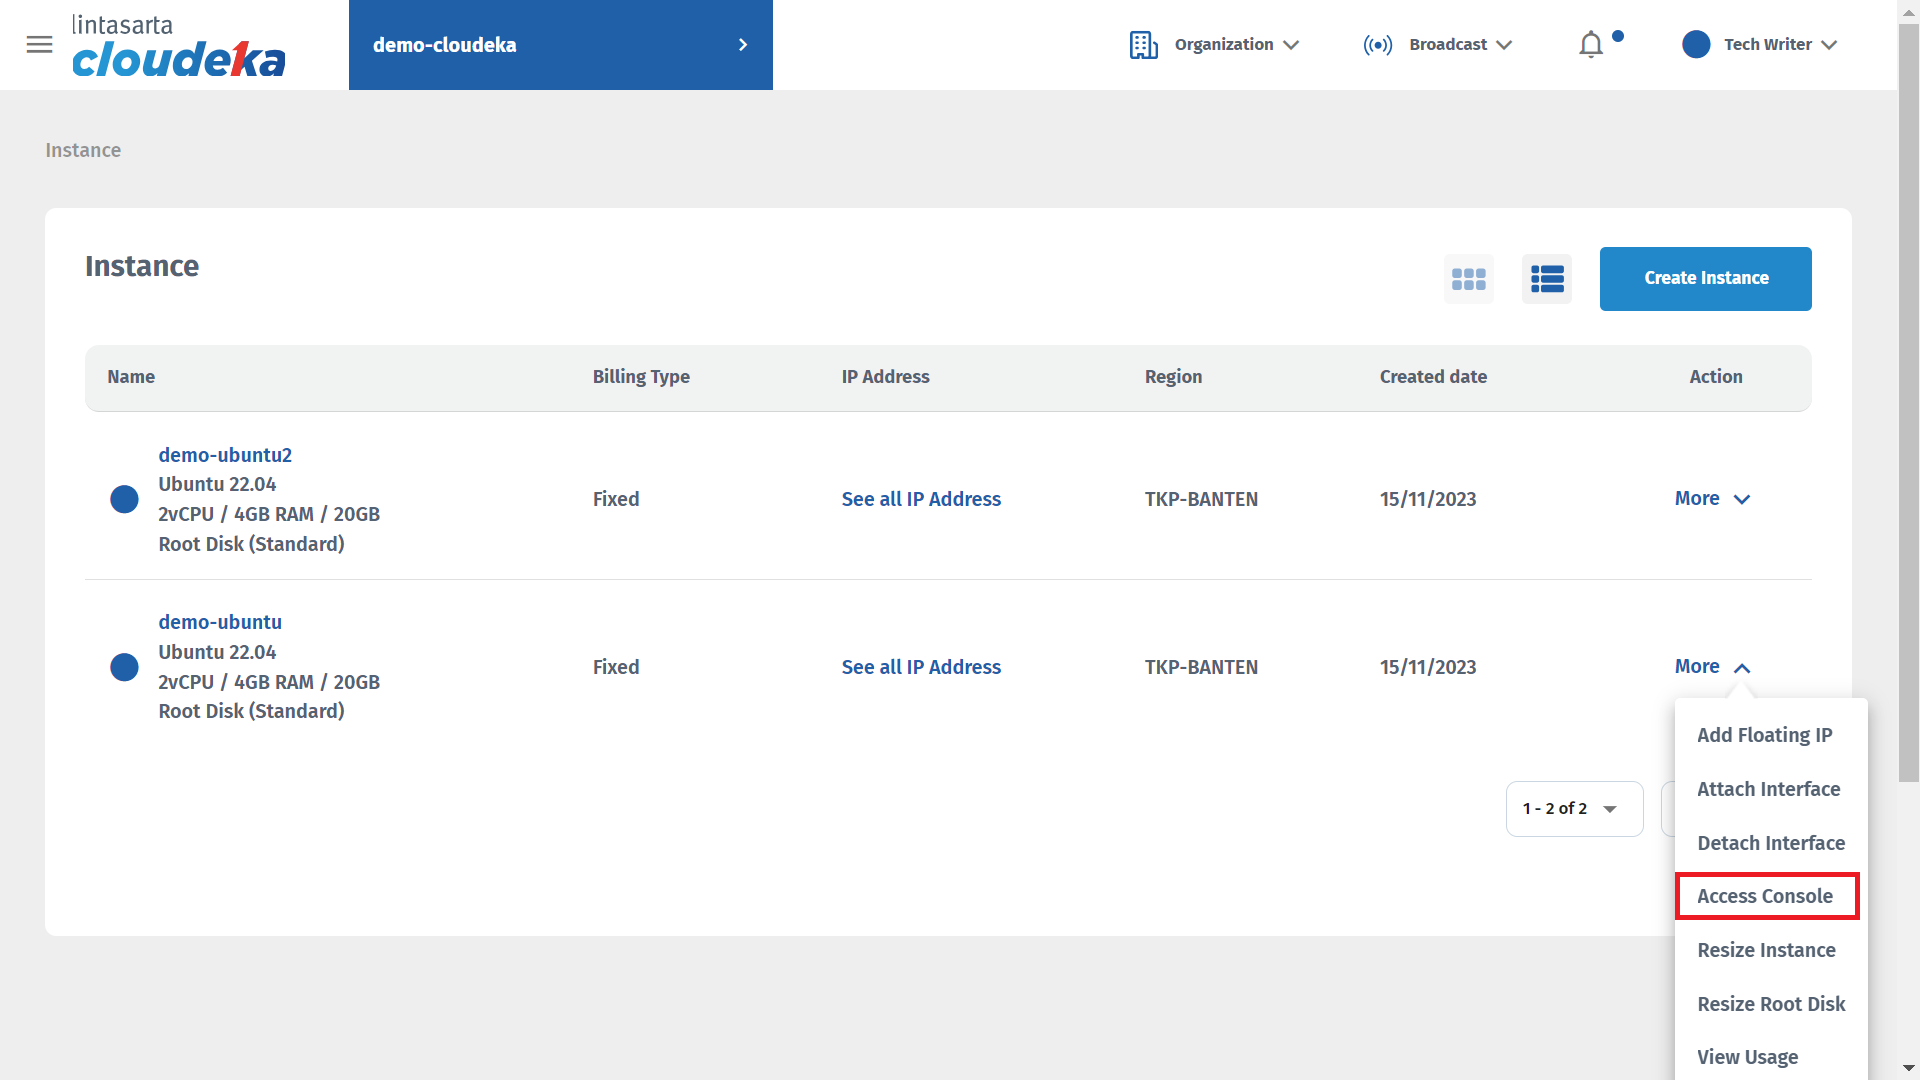
After adding the VPC interface to each virtual machine, the next step is to access the virtual machine console to configure the interface used via the 50-cloud-init.yaml file in the netplan folder. Access the first virtual machine console, namely demo-ubuntu, via the Cloudeka portal service by pressing the More button then selecting Access Console.

The default username is root and the password is used.

After successfully logging in, check the port used by the network interface by typing "ip addr".

The following is an explanation of the response results from entering the ip addr syntax command. In the ens3 section is the port used to initialize the first VPC interface to be paired, while ens7 is the second VPC interface. Copy the MAC address used by ens7 to be added to the 50-cloud-init.yaml file

To update the interface used on ens3 and ens7 to match the IPv4 address used on the Cloudeka portal service page by entering the syntax below.

nano /etc/netplan/50-cloud-init.yaml

Display the contents of the 50-cloud-init.yaml file, and enter the syntax format below.

ensX:
       dhcp4: no
       addressess: [IP Address/24] // Alamat IPv4 lokal digunakan pada instance.
       nameservers:
           addresses: [8.8.8.8,8.8.4.4] //Alamat IP yang digunakan Google.    
ensX:
       dhcp4: true
       match:
             macaddresses: //Alamat MAC Address yang digunakan antamuka kedua.
       set-name: ensX

After updating the contents of the 50-cloud-init.yaml file, press CTRL + X on the keyboard and the letter Y to save the changes.

Enter the syntax “netplan apply” to apply the changes that have been made to the 50-cloud-init.yaml file.

To check that the changes made are correct, type the syntax "ip addr". The response result is that Ens3 has used the IP address 172.16.10.157, and Ens7 has used the MAC address fa:16:3e:c9:a9:b6.

After successfully configuring the interface used on the demo-ubuntu virtual machine, then do the same steps on the demo-ubuntu2 virtual machine, only in the 50-cloud-init.yaml file using the following syntax format.

ensX:
       dhcp4: true
       match:
             macaddresses: //MAC address used by the first interface.
       mtu: 8942
       set-name: ensX        
ensX:
       dhcp4: no
       addressess: [IP Address/24] // The local IPv4 address that the second VPC uses.
       nameservers:
           addresses: [8.8.8.8,8.8.4.4] //DNS Google.

If you have made file changes to 50-cloud-init.yaml on the demo-ubuntu2 virtual machine, type the syntax "netplan apply" to apply the changes and the syntax "ip-addr" to check the changes that have been made.

Configuration Interface
Page cover image