# Configuration Load Balancer

## Add Backend & Frontend

You can configure Load balancer by adding the backend configuration first and then configuring the frontend. Here are the steps to add a backend configuration to the load balancer in Deka Harbor.

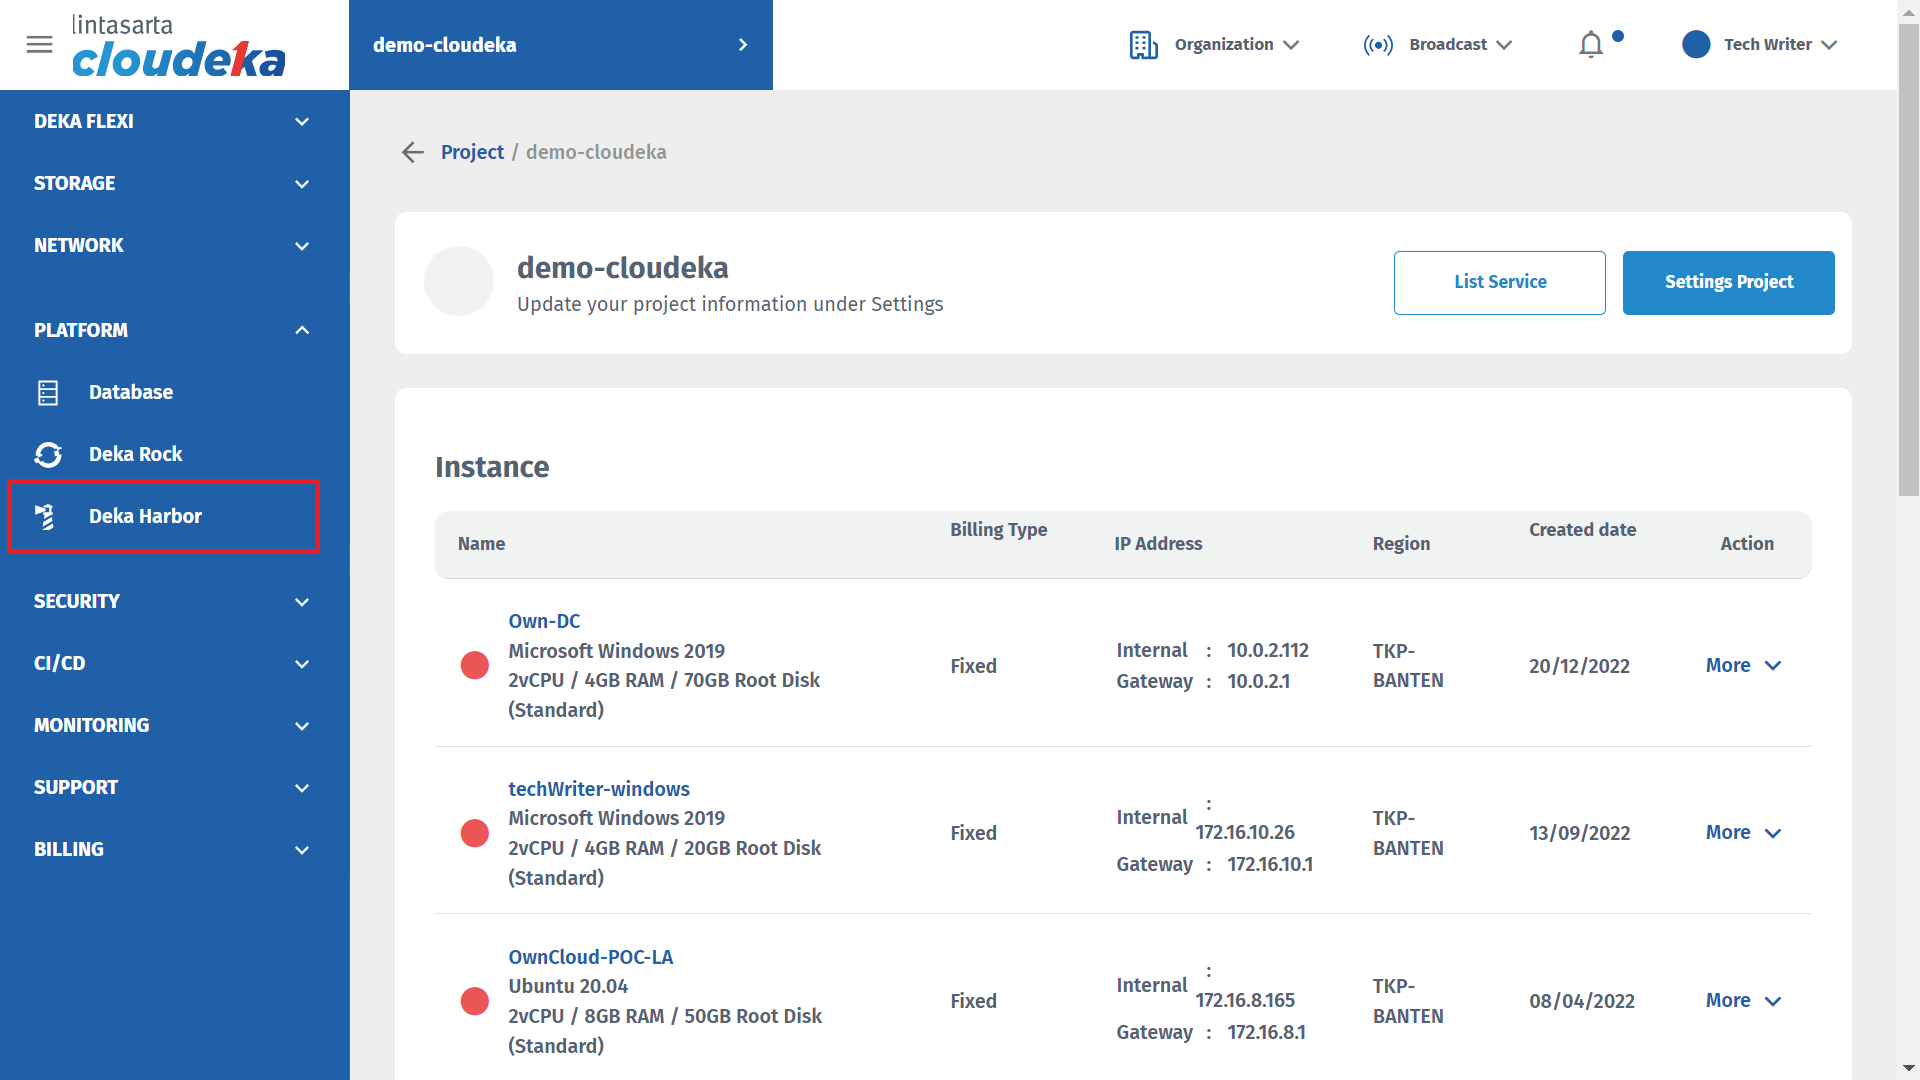
* On the service page of the Cloudka portal select the Deka Harbor menu on the Platform.

<figure><img src="https://putri.box.cloudeka.id/cloudeka-assets/static/images/20dekaharbor/20.1create.png" alt=""><figcaption><p>Add Backend &#x26; Frontend (a)</p></figcaption></figure>

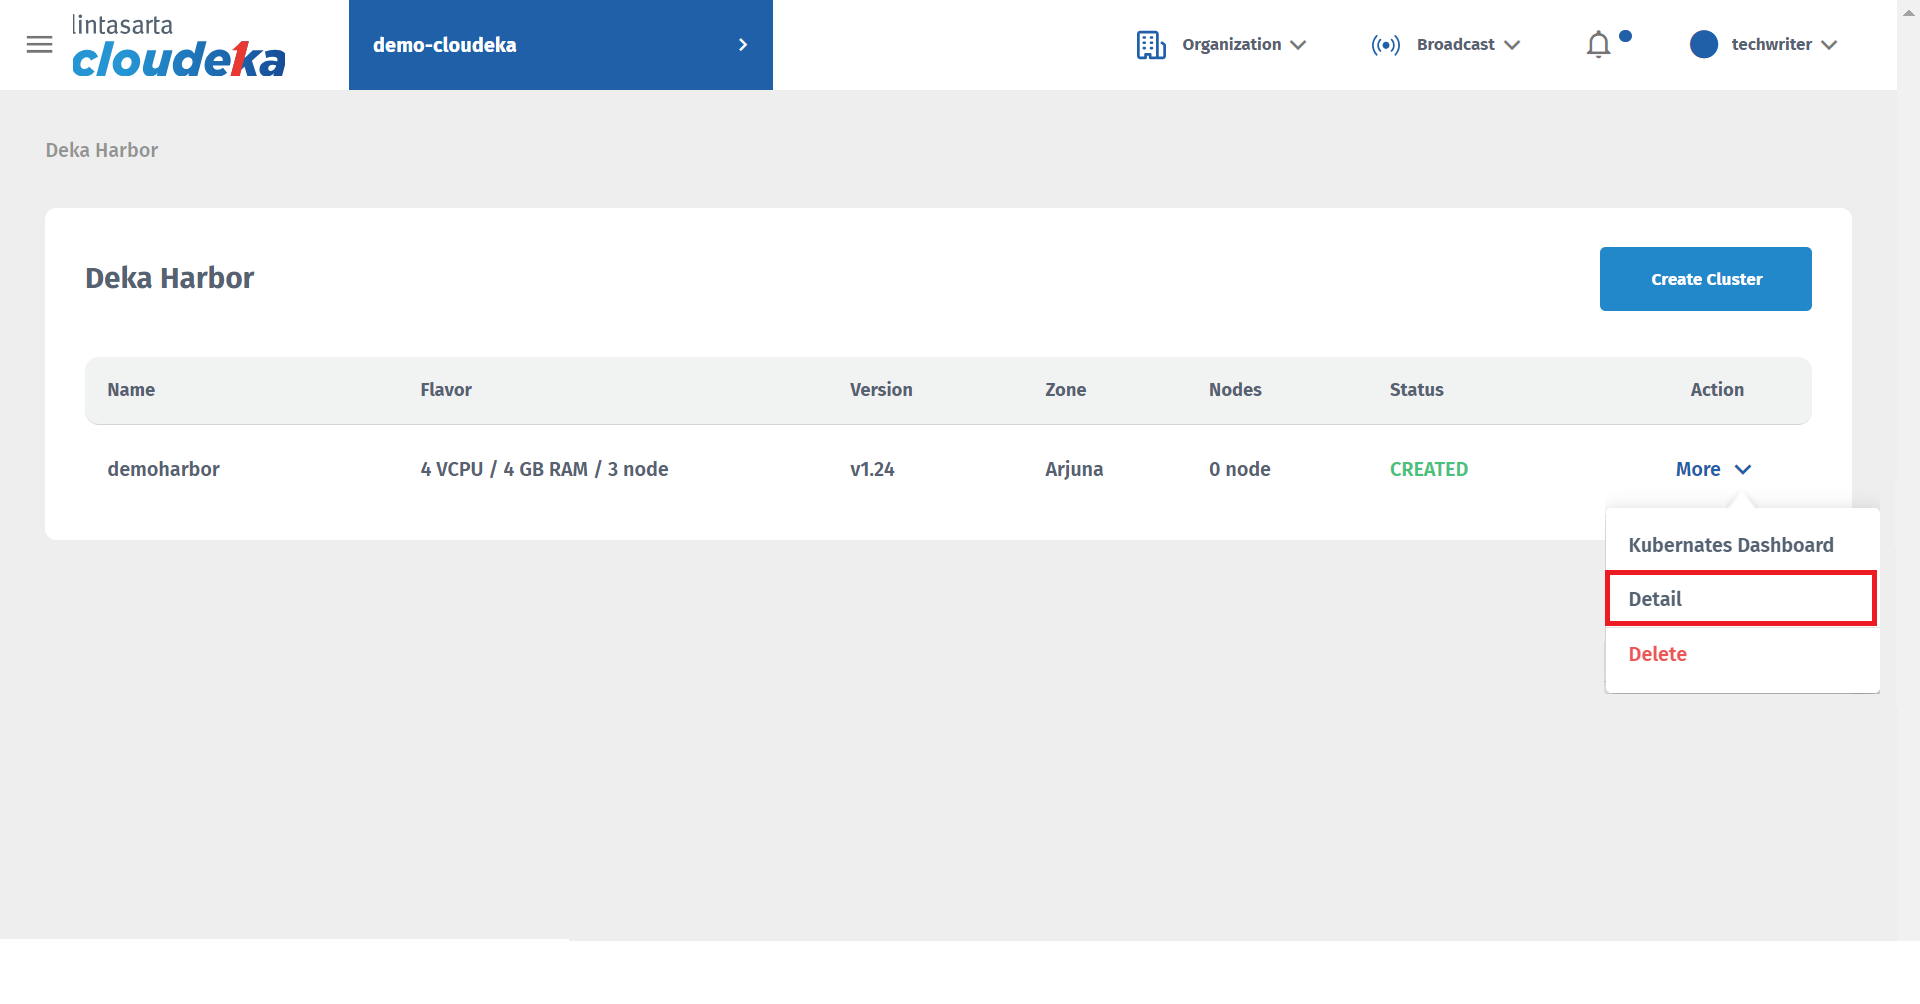
* Select the cluster to add to the Load Balancer configuration by clicking More in the Action column and clicking Detail.

<figure><img src="https://putri.box.cloudeka.id/cloudeka-assets/static/images/20dekaharbor/20.16detail.png" alt=""><figcaption><p>Add Backend &#x26; Frontend (b)</p></figcaption></figure>

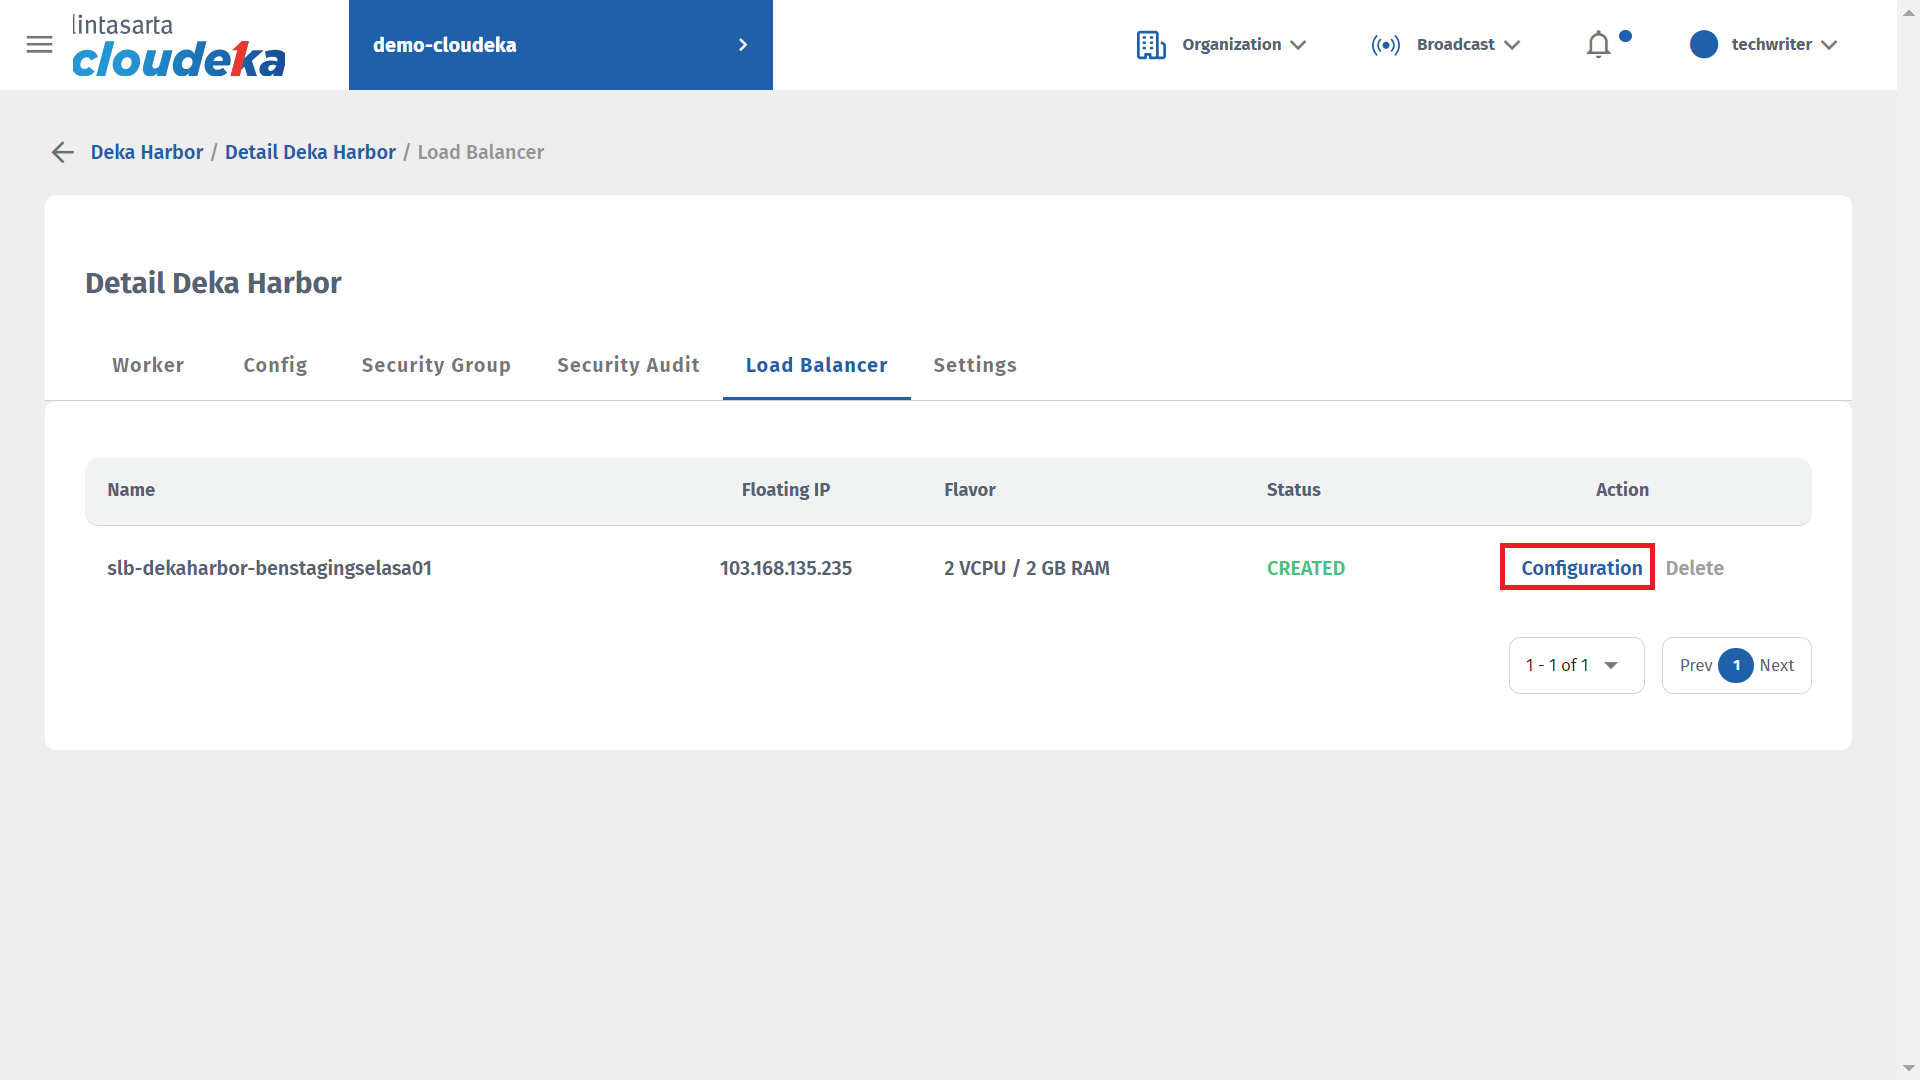
* Select the Load Balancer tab click Configuration in the Action column.

<figure><img src="https://putri.box.cloudeka.id/cloudeka-assets/static/images/20dekaharbor/20.27config.png" alt=""><figcaption><p>Add Backend &#x26; Frontend (c)</p></figcaption></figure>

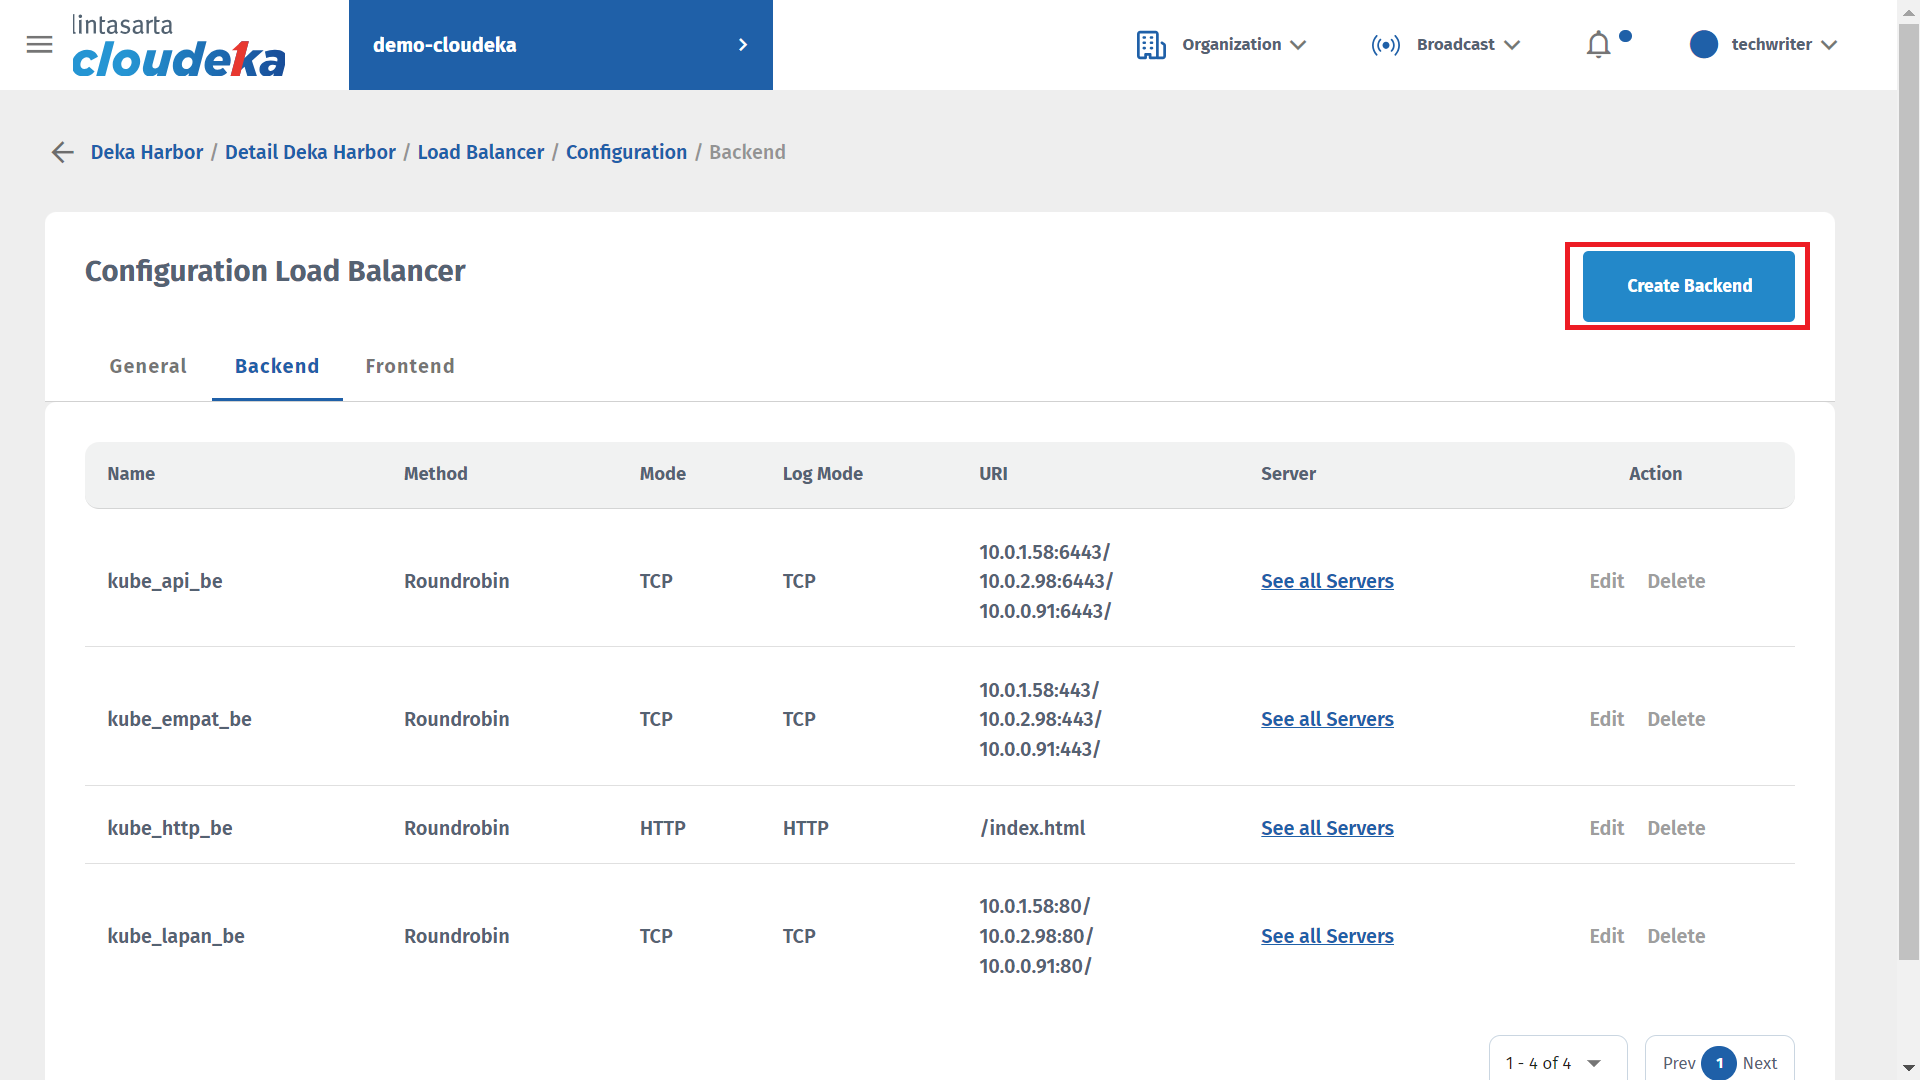
* On the Backend tab click Create Backend.

<figure><img src="https://putri.box.cloudeka.id/cloudeka-assets/static/images/20dekaharbor/20.28add.png" alt=""><figcaption><p>Add Backend &#x26; Frontend (d)</p></figcaption></figure>

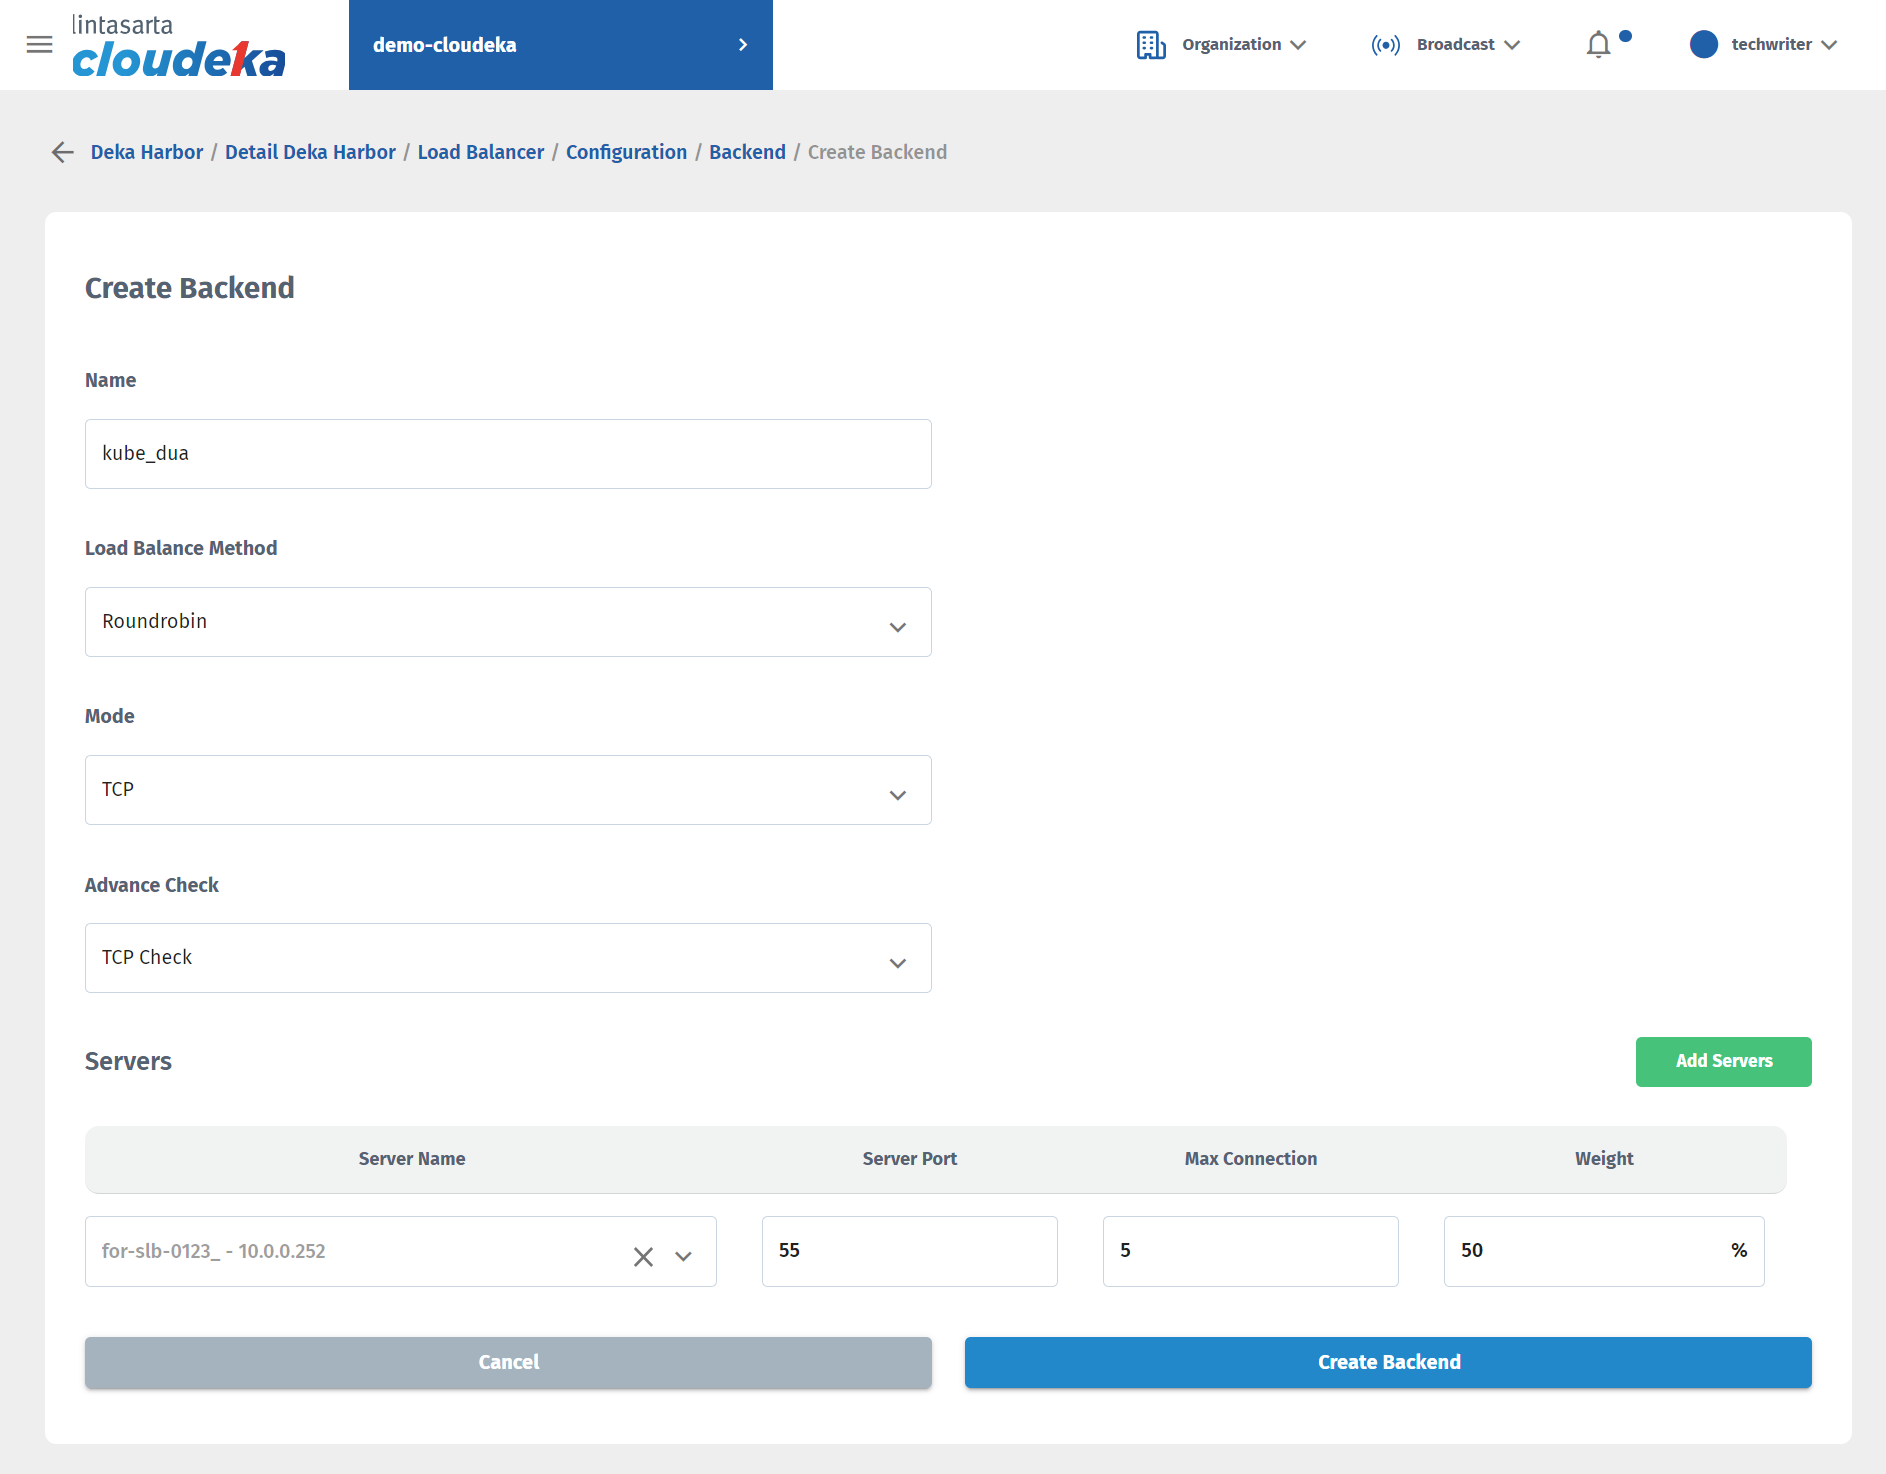
* Fill in the fields available in the Create Backend form to suit your needs. Click Create Backend to continue with the Backend creation process.

<figure><img src="https://putri.box.cloudeka.id/cloudeka-assets/static/images/20dekaharbor/20.29addbe.png" alt=""><figcaption><p>Add Backend &#x26; Frontend (e)</p></figcaption></figure>

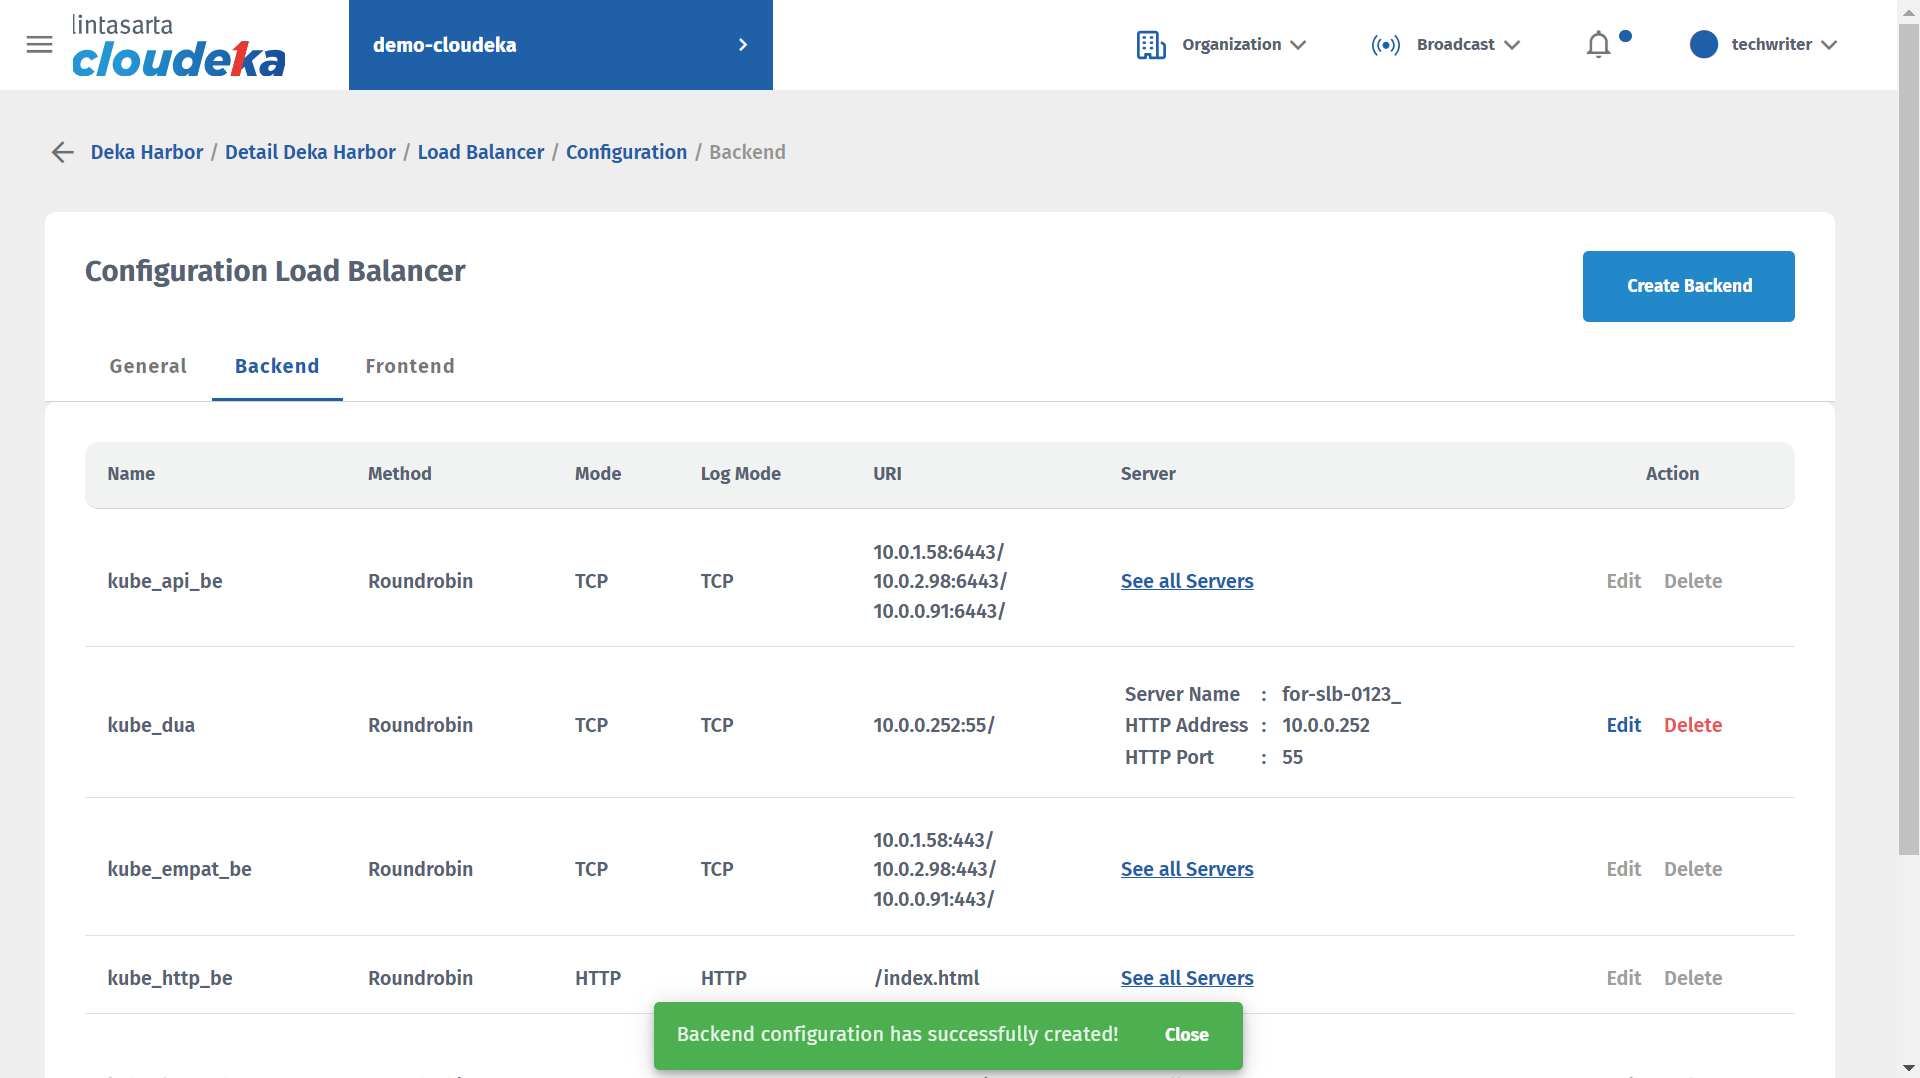
* The "Backend configuration has successfully created!" notification displays.

<figure><img src="https://putri.box.cloudeka.id/cloudeka-assets/static/images/20dekaharbor/20.30sukses.png" alt=""><figcaption><p>Add Backend &#x26; Frontend (f)</p></figcaption></figure>

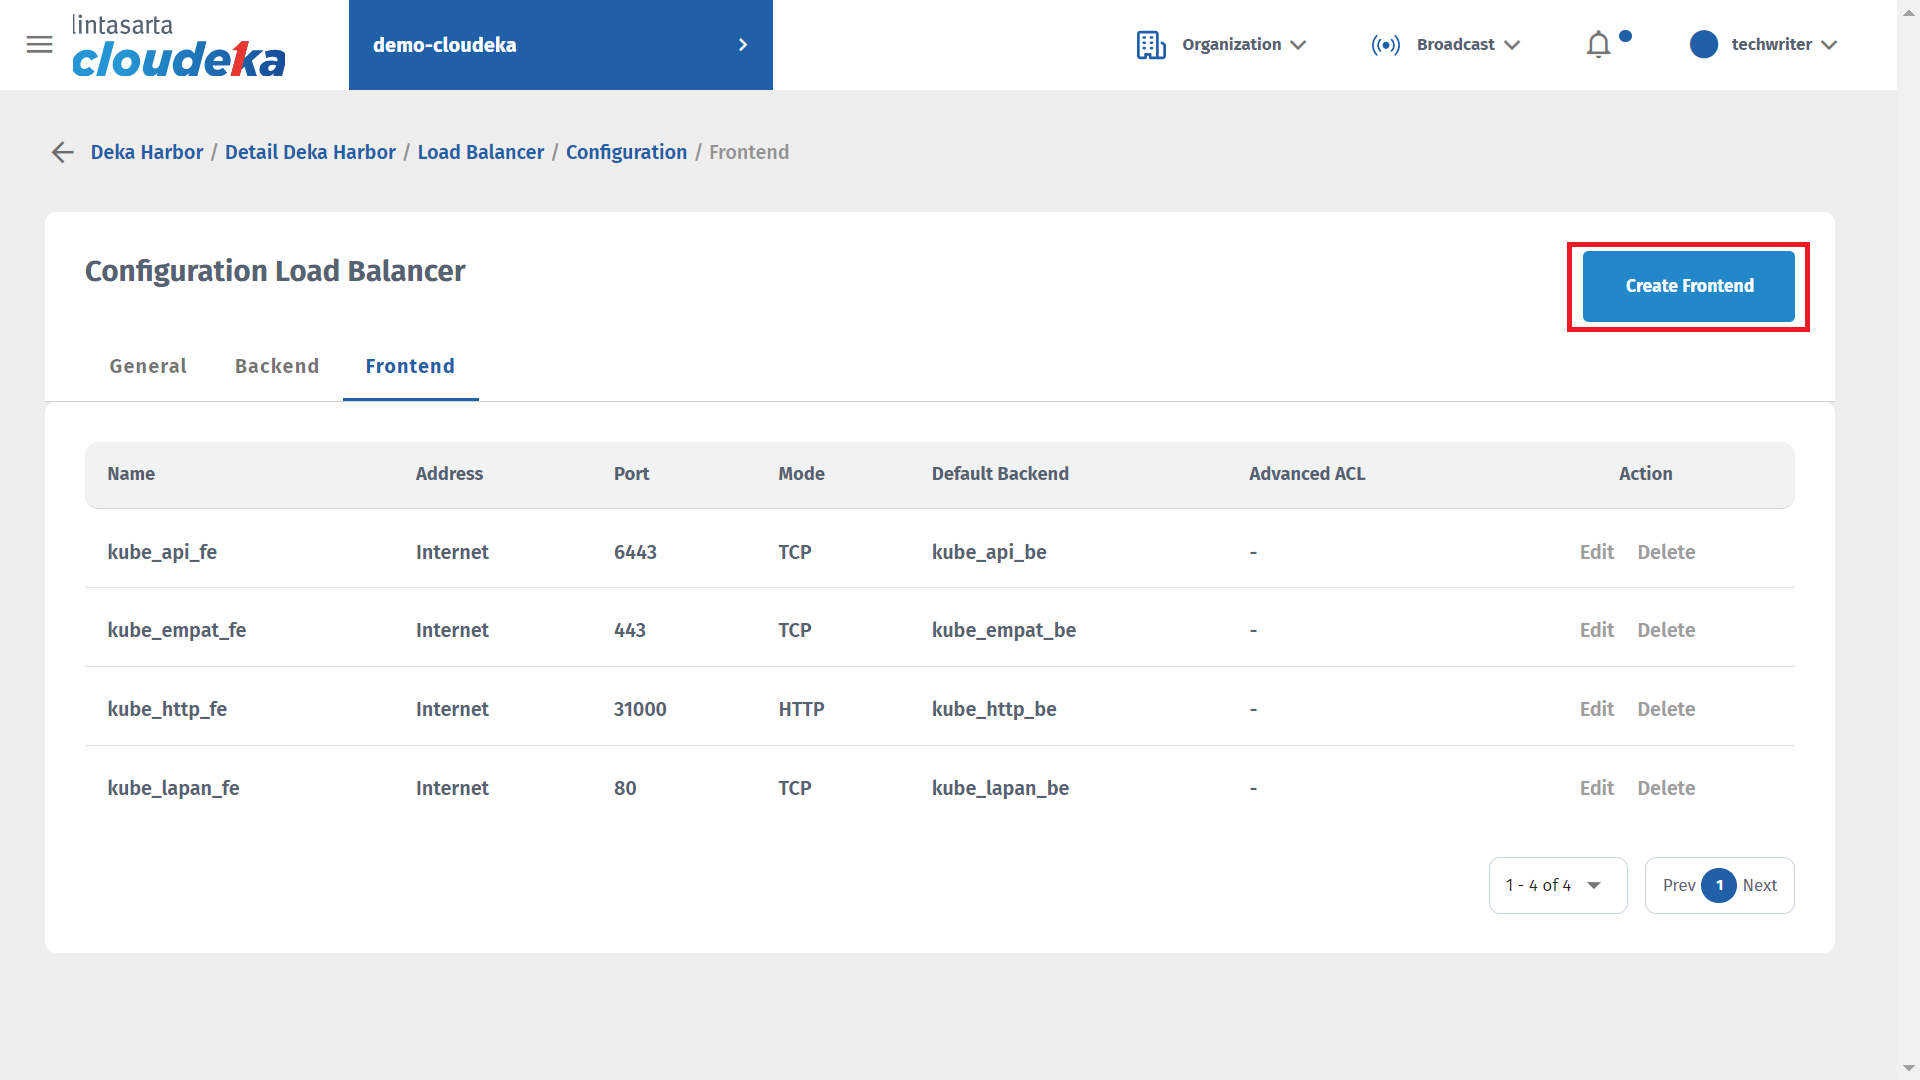
* Next step add Frontend settings by clicking the Frontend tab click Create Frontend.

<figure><img src="https://putri.box.cloudeka.id/cloudeka-assets/static/images/20dekaharbor/20.31addfe.png" alt=""><figcaption><p>Add Backend &#x26; Frontend (g)</p></figcaption></figure>

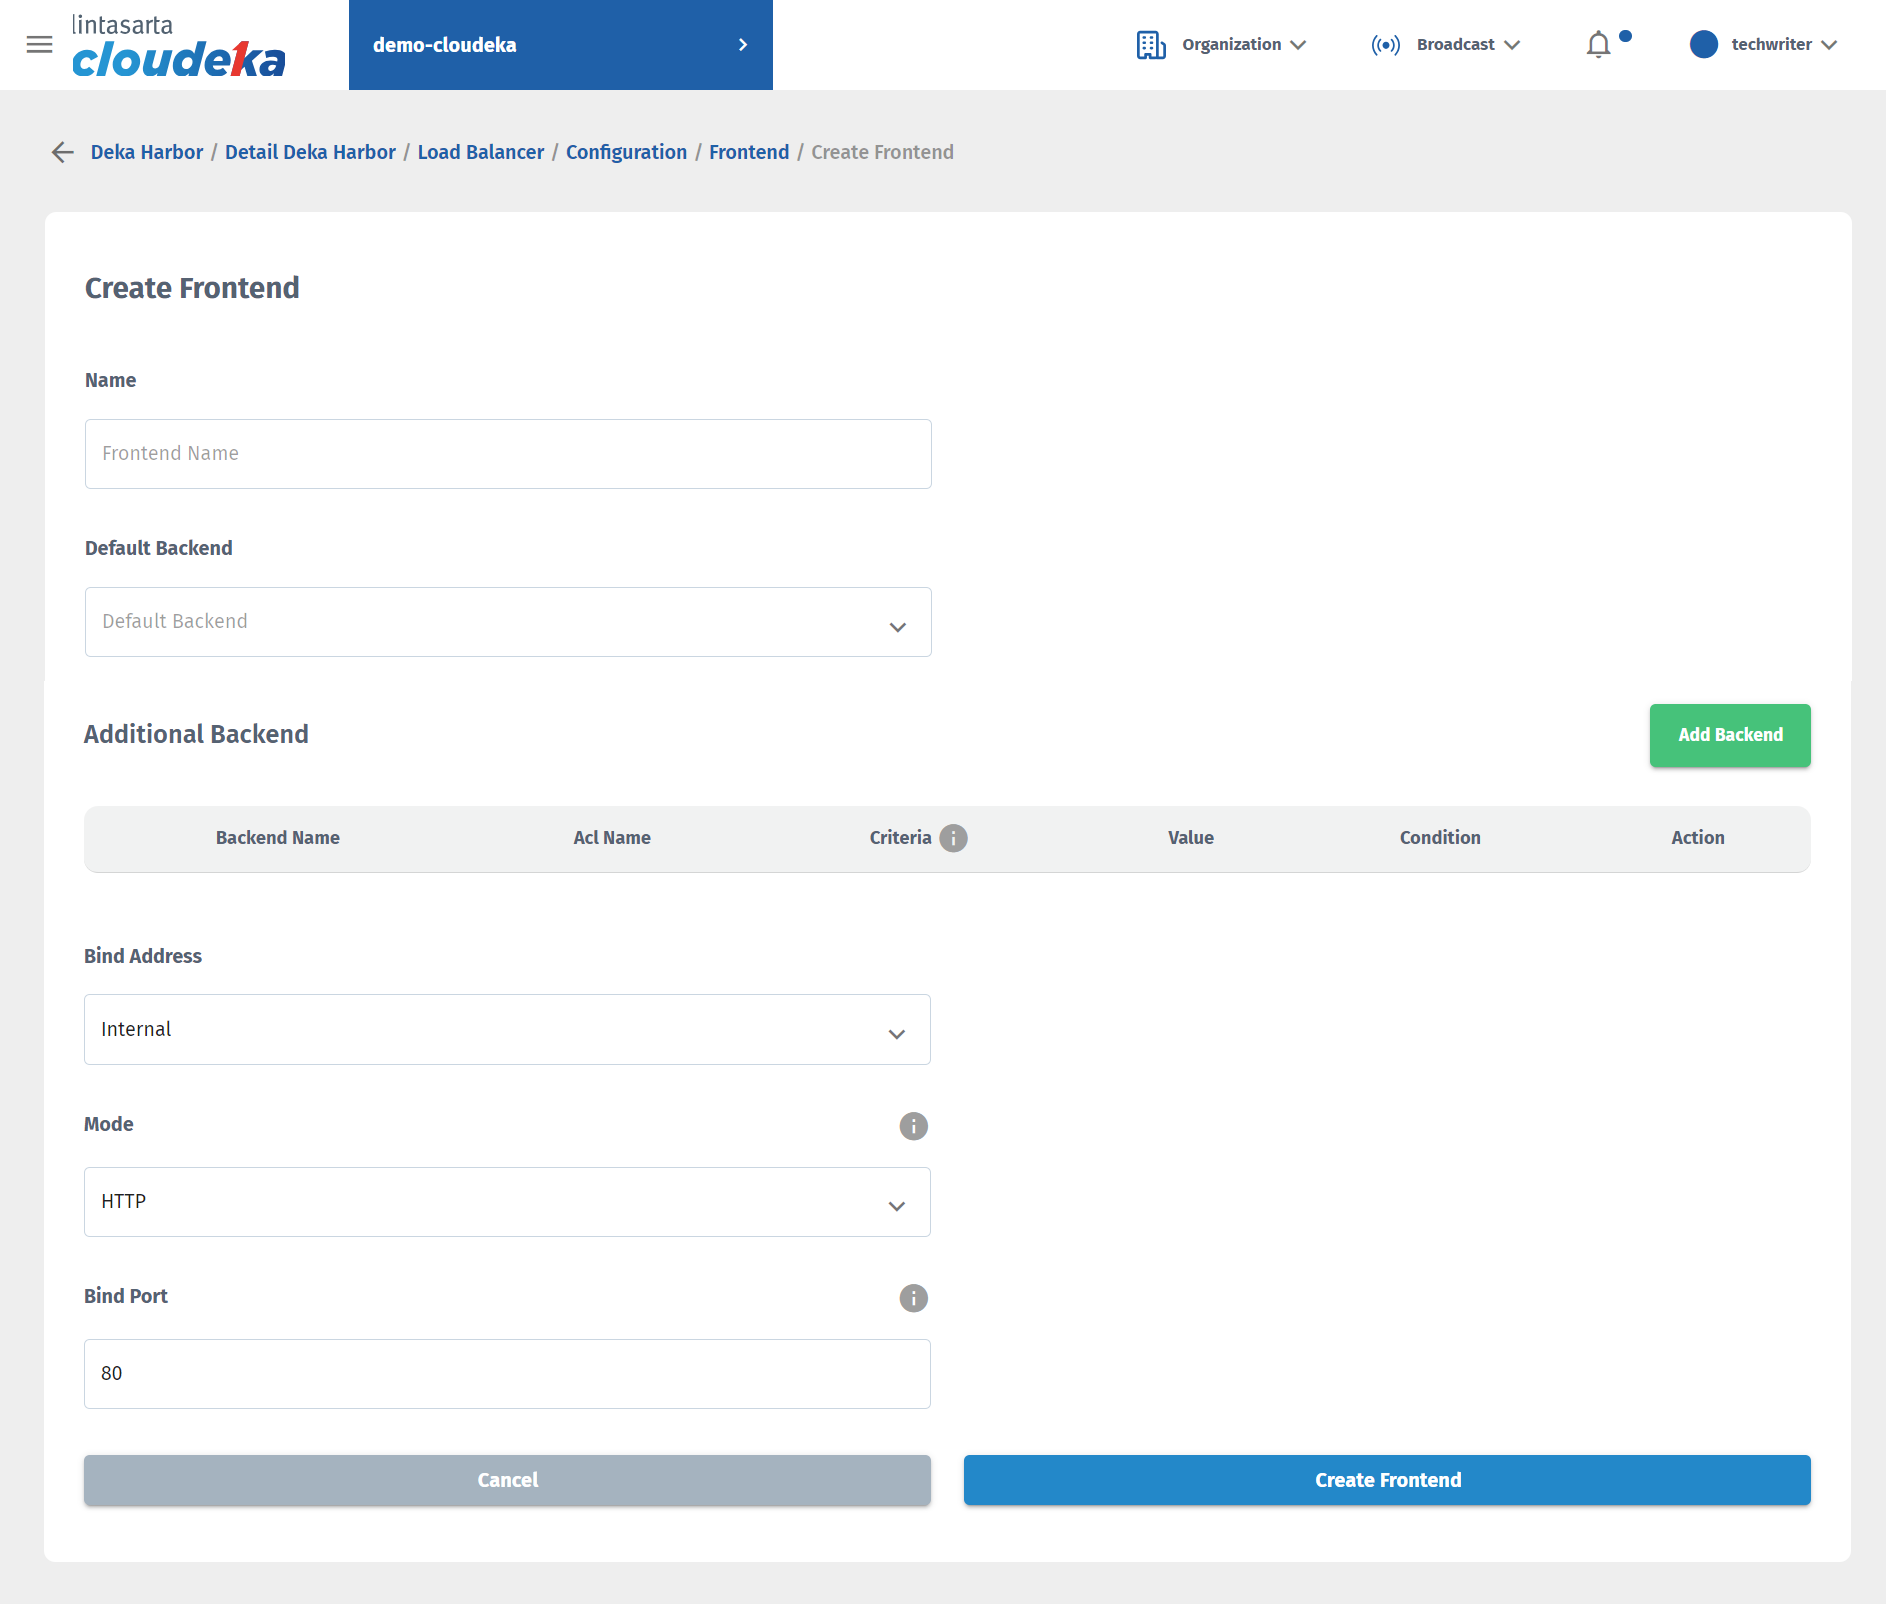
* Fill in the Create Frontend form and click Create Frontend to continue with the process.

<figure><img src="https://putri.box.cloudeka.id/cloudeka-assets/static/images/20dekaharbor/20.32addde.png" alt=""><figcaption><p>Add Backend &#x26; Frontend (h)</p></figcaption></figure>

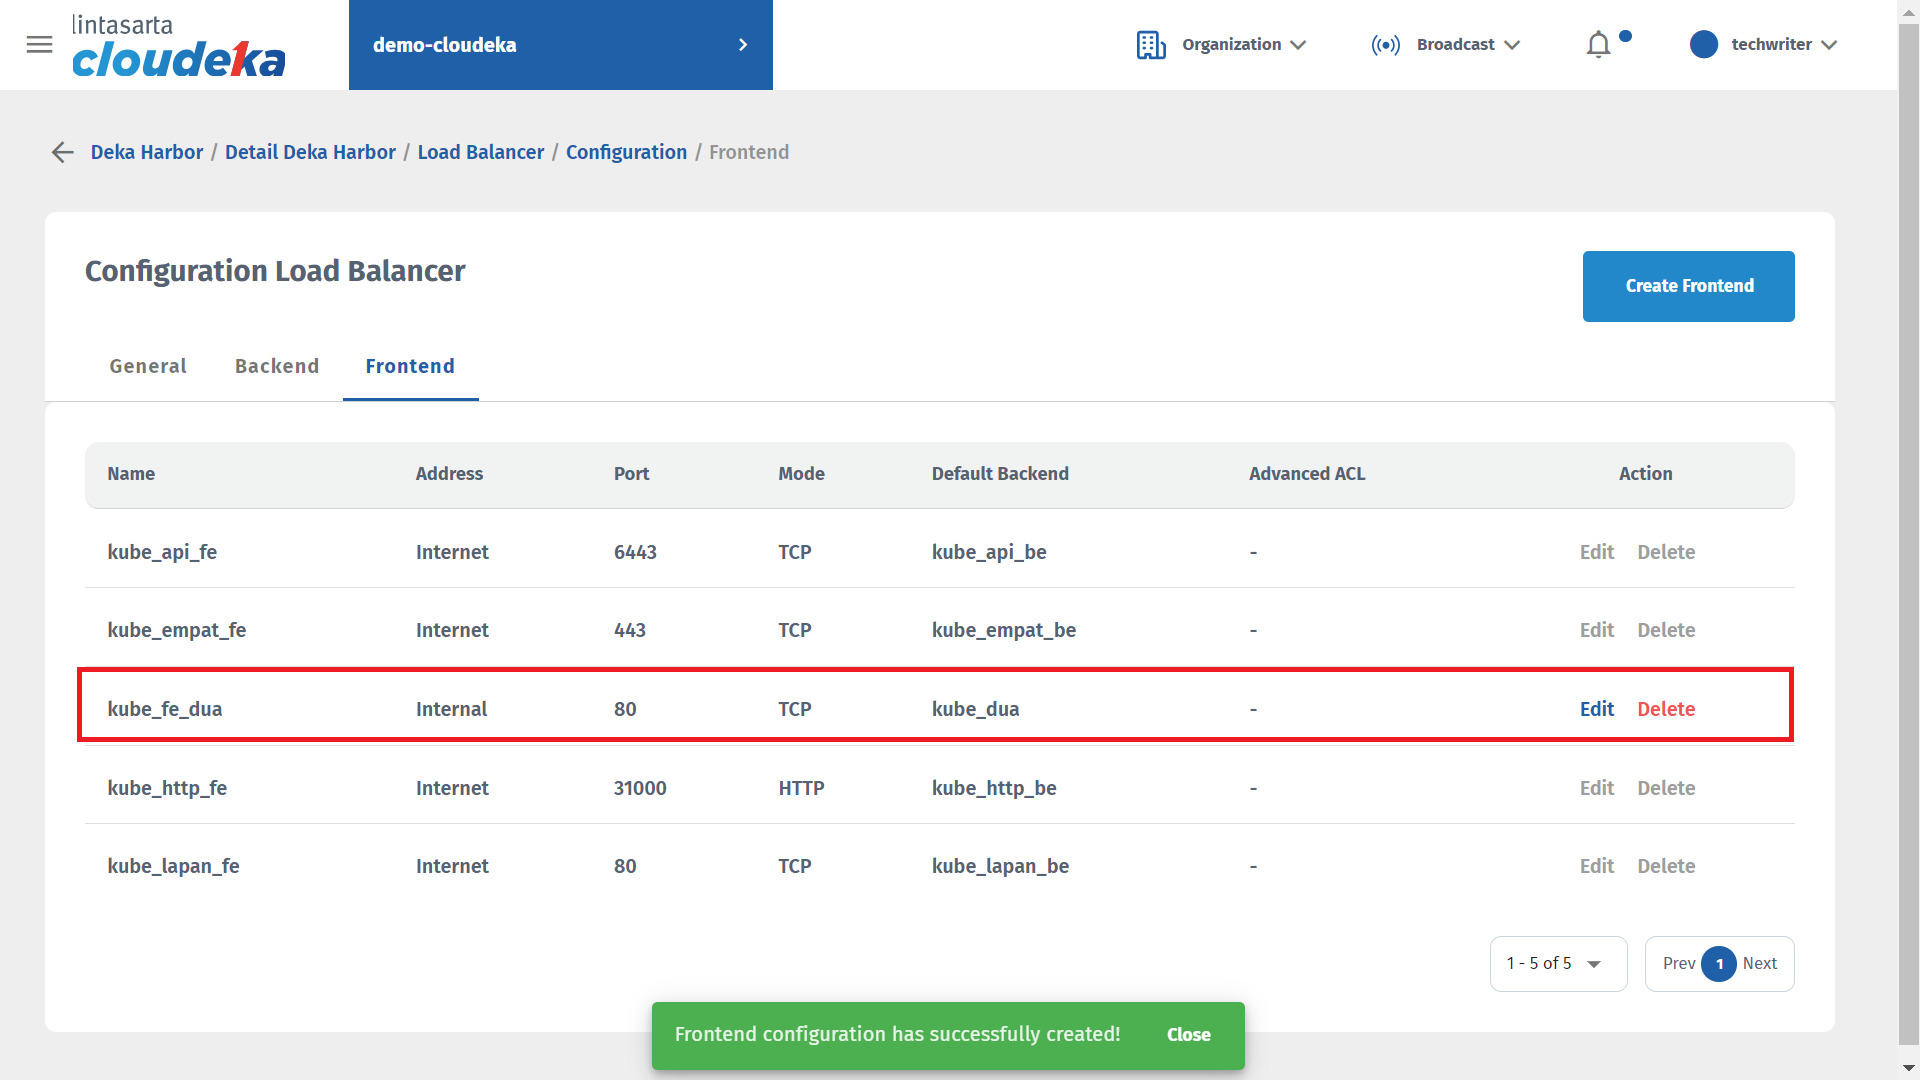
* The "Frontend configuration has successfully created!" notification displays.

<figure><img src="https://putri.box.cloudeka.id/cloudeka-assets/static/images/20dekaharbor/20.33addfe.png" alt=""><figcaption><p>Add Backend &#x26; Frontend (i)</p></figcaption></figure>

## Delete Backend & Frontend

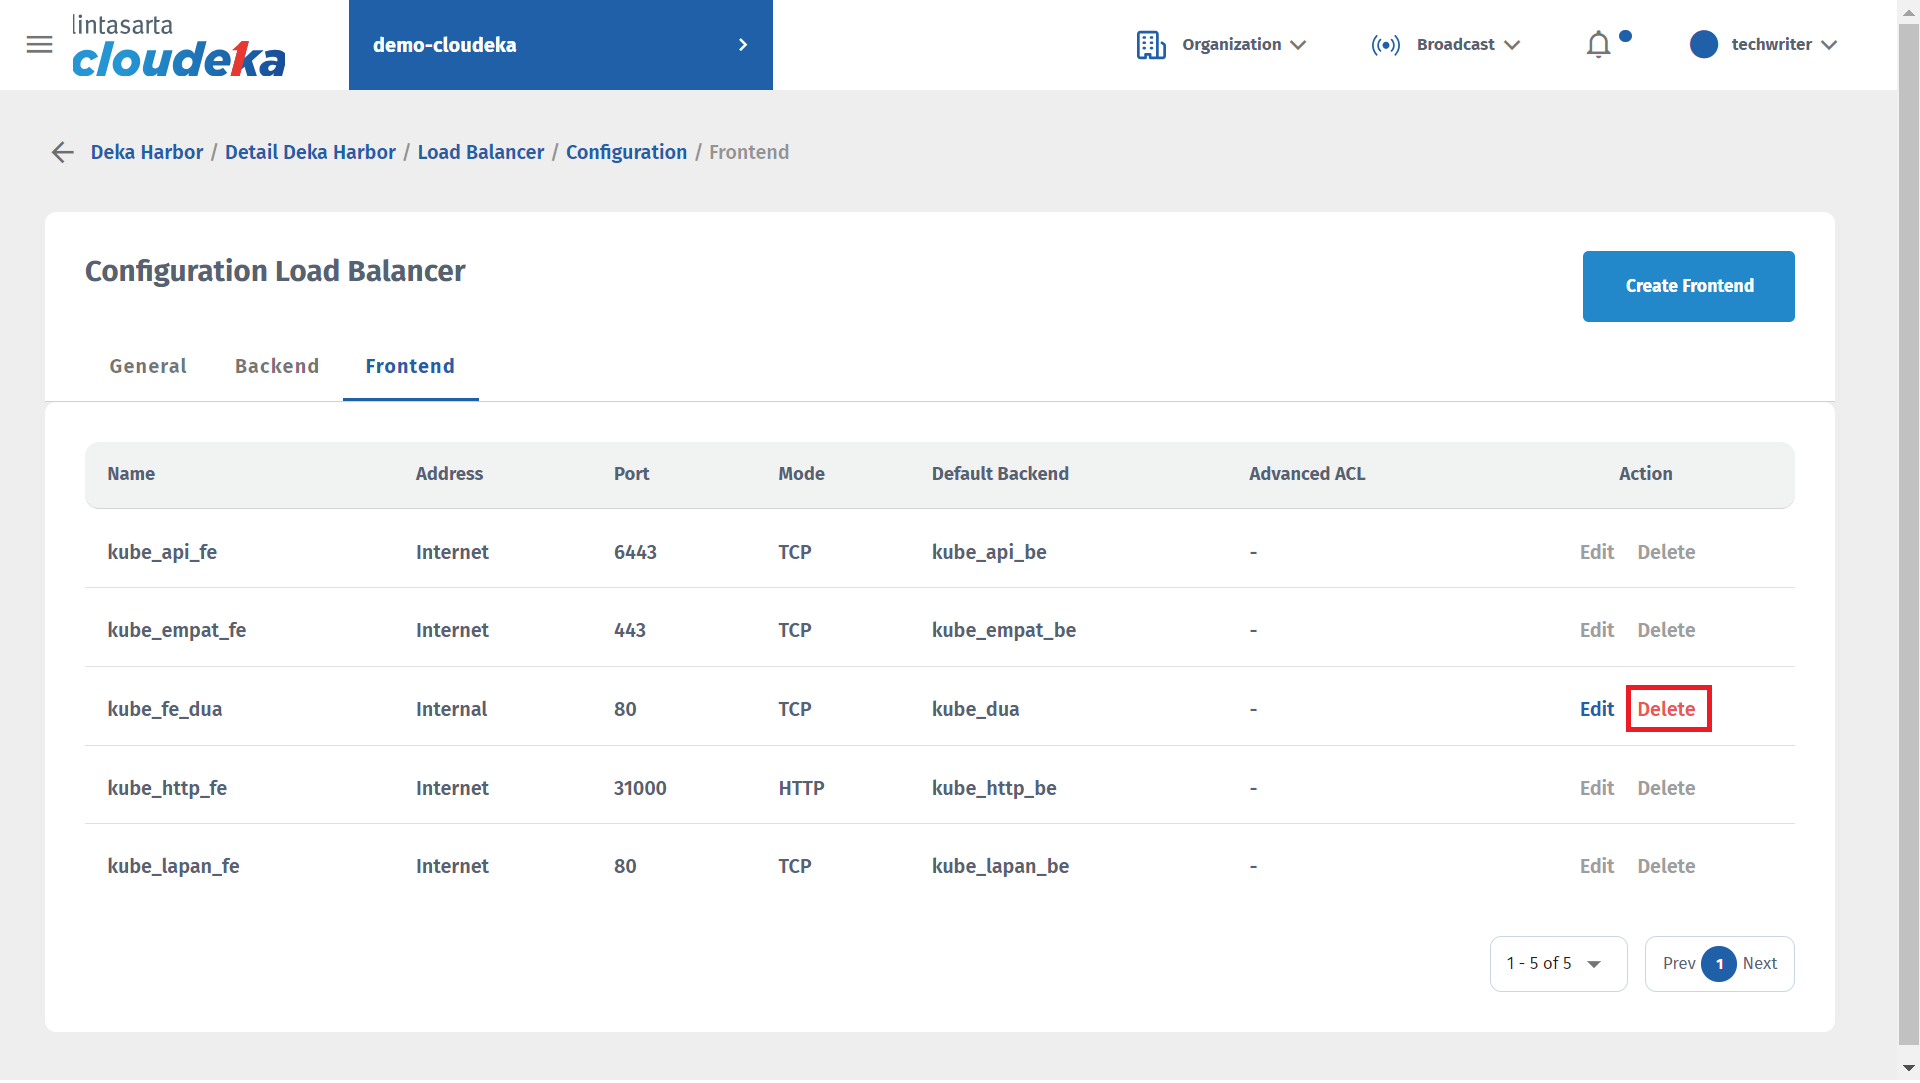
If you want to remove the Load Balancer configuration in Deka Harbor, make sure you first remove the configuration on the frontend. Here are the steps to remove the configuration on Load Balancer:

* On the Load Balancer Configuration page select the Frontend tab click Delete.

<figure><img src="https://putri.box.cloudeka.id/cloudeka-assets/static/images/20dekaharbor/20.34delfe.png" alt=""><figcaption><p>Delete Backend &#x26; Frontend (a)</p></figcaption></figure>

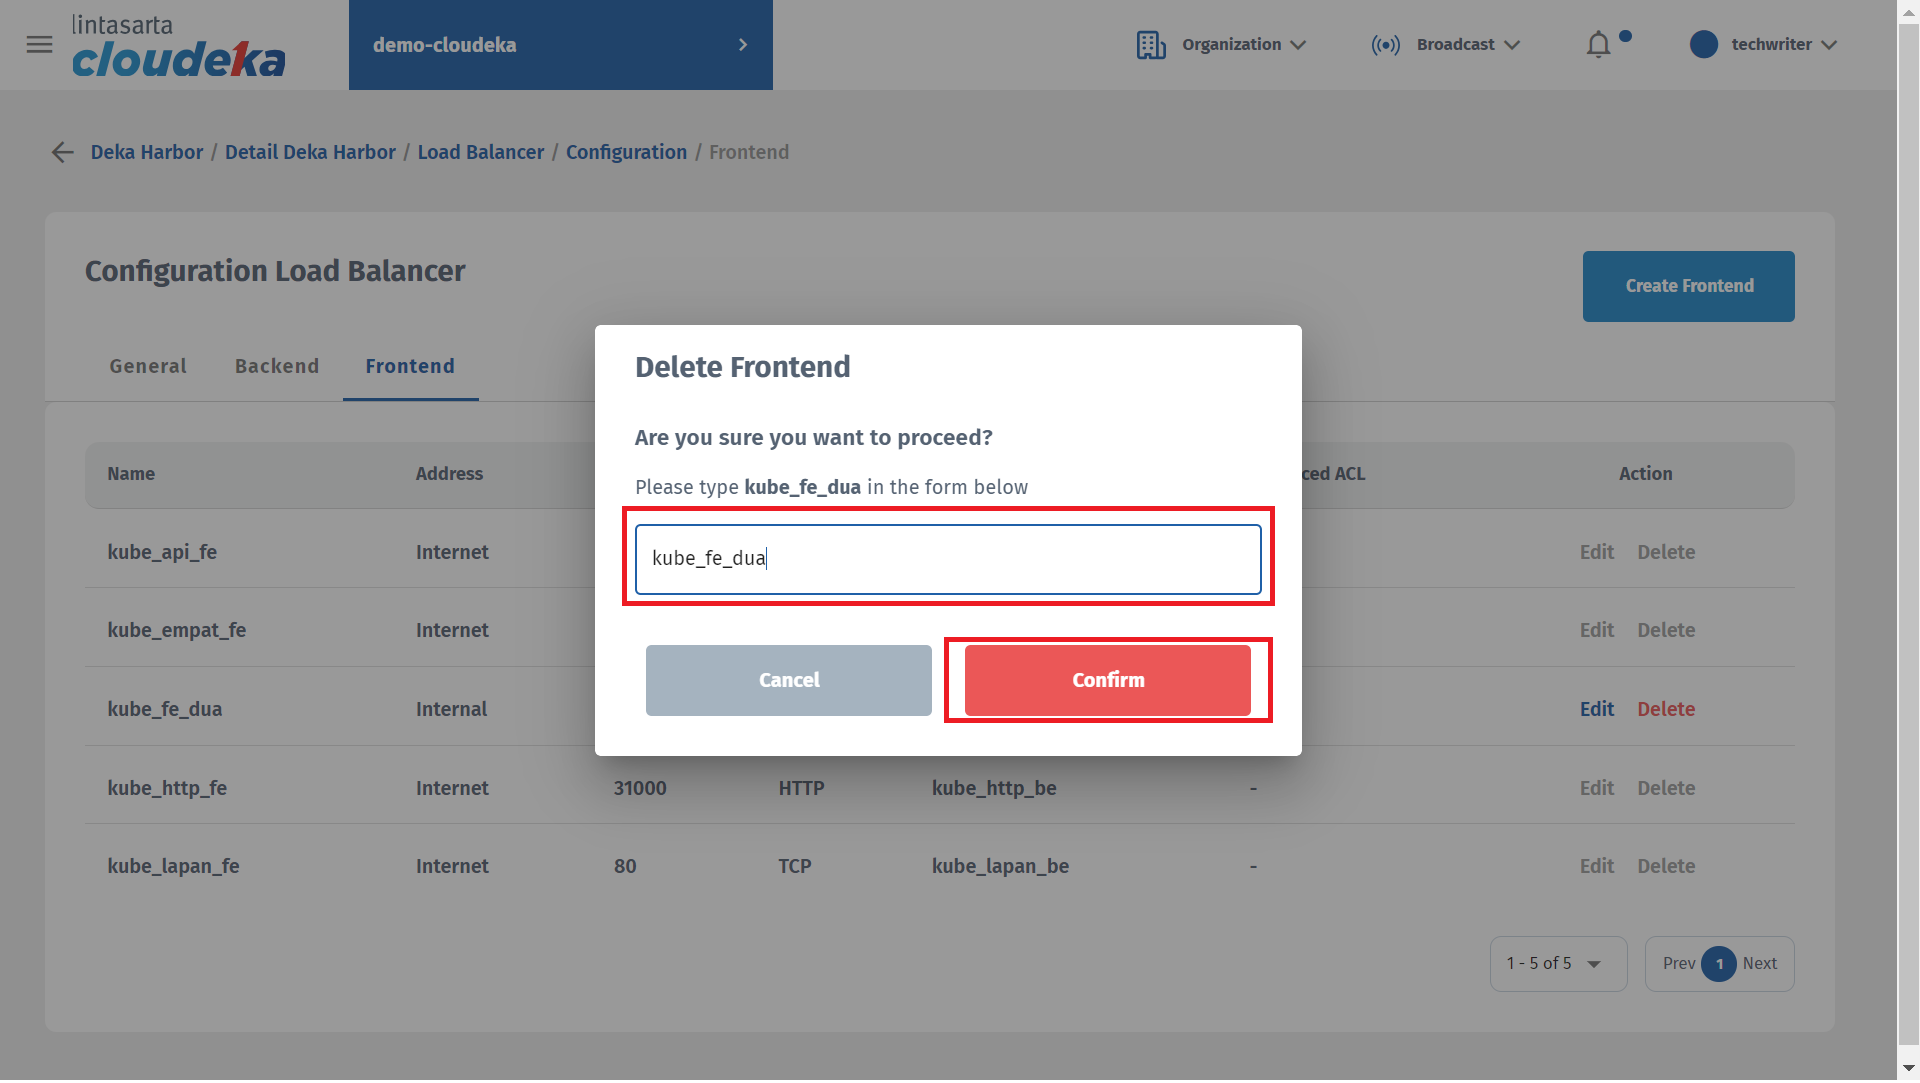
* Click the Confirm button to continue with the process.

<figure><img src="https://putri.box.cloudeka.id/cloudeka-assets/static/images/20dekaharbor/20.35delfront.png" alt=""><figcaption><p>Delete Backend &#x26; Frontend (b)</p></figcaption></figure>

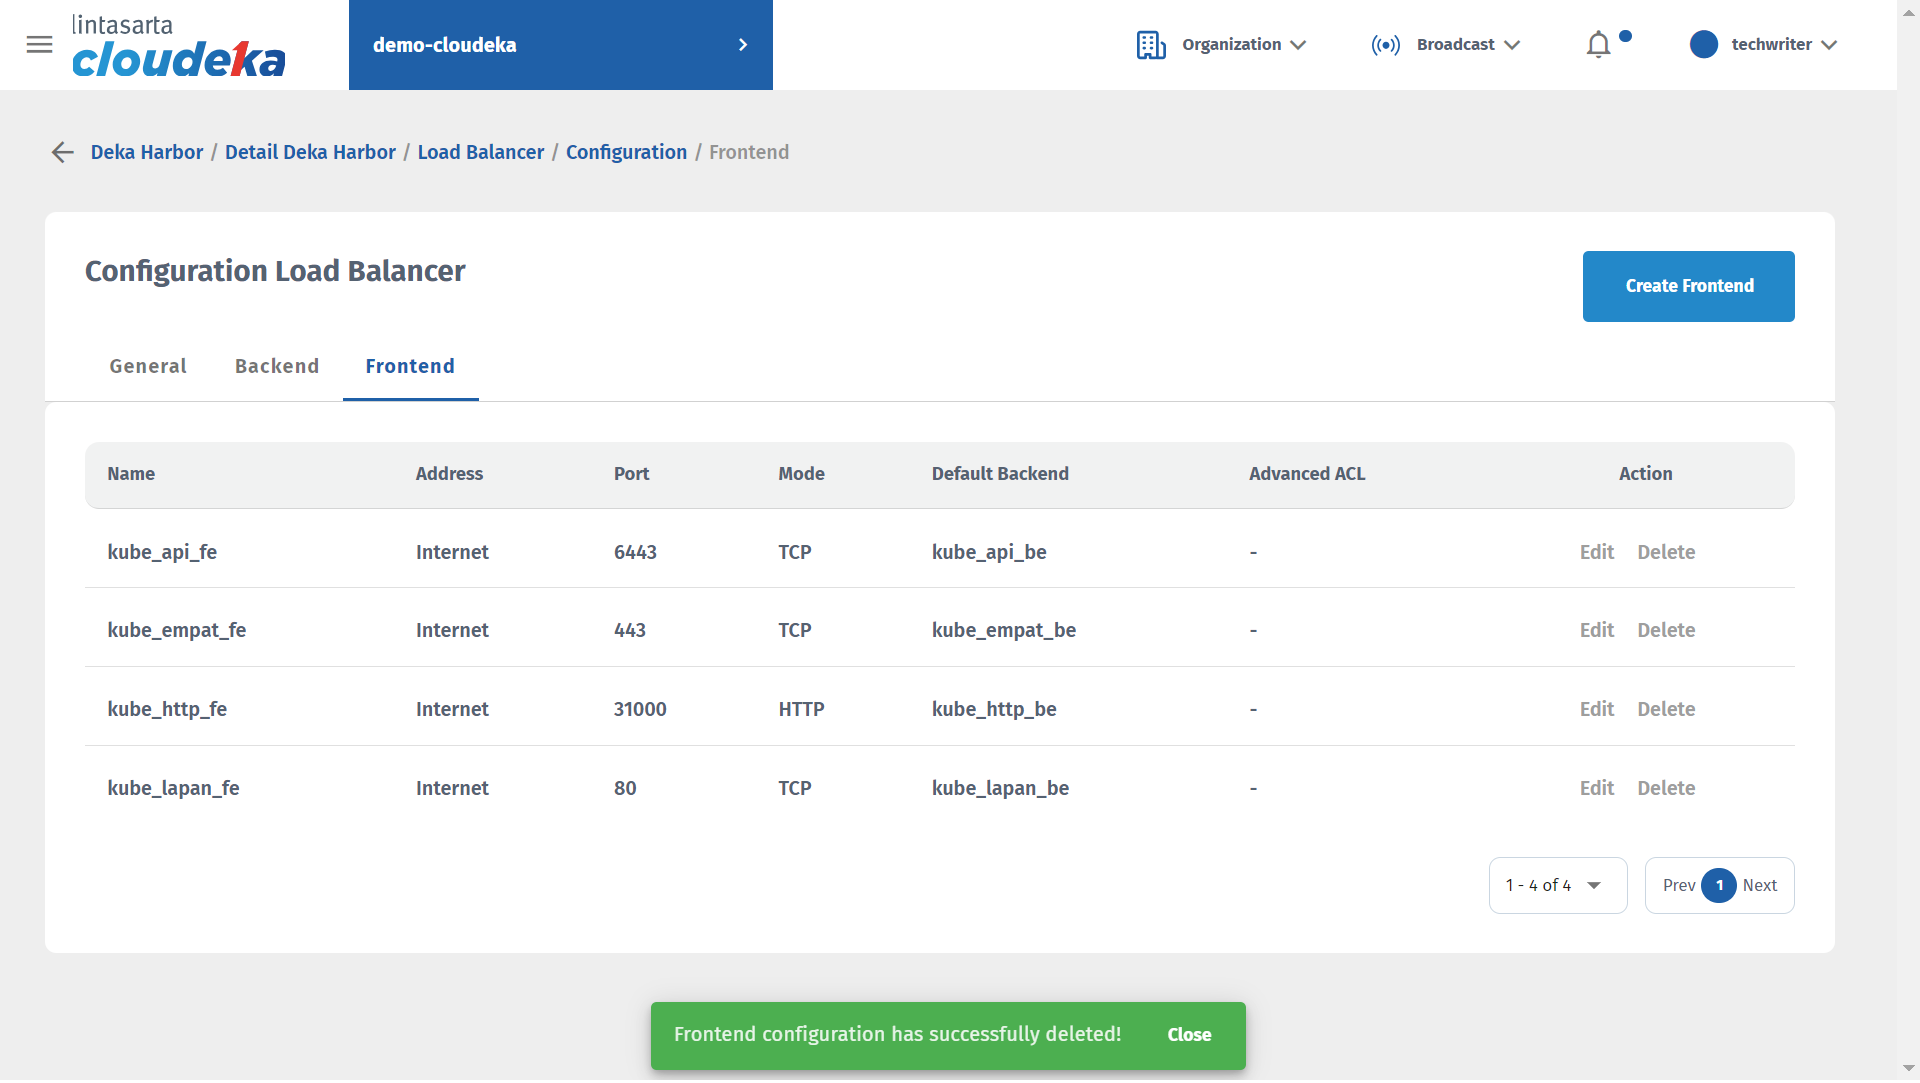
* The "Frontend configuration has successfully deleted!" notice displays.

<figure><img src="https://putri.box.cloudeka.id/cloudeka-assets/static/images/20dekaharbor/20.36notifdel.png" alt=""><figcaption><p>Delete Backend &#x26; Frontend (c)</p></figcaption></figure>

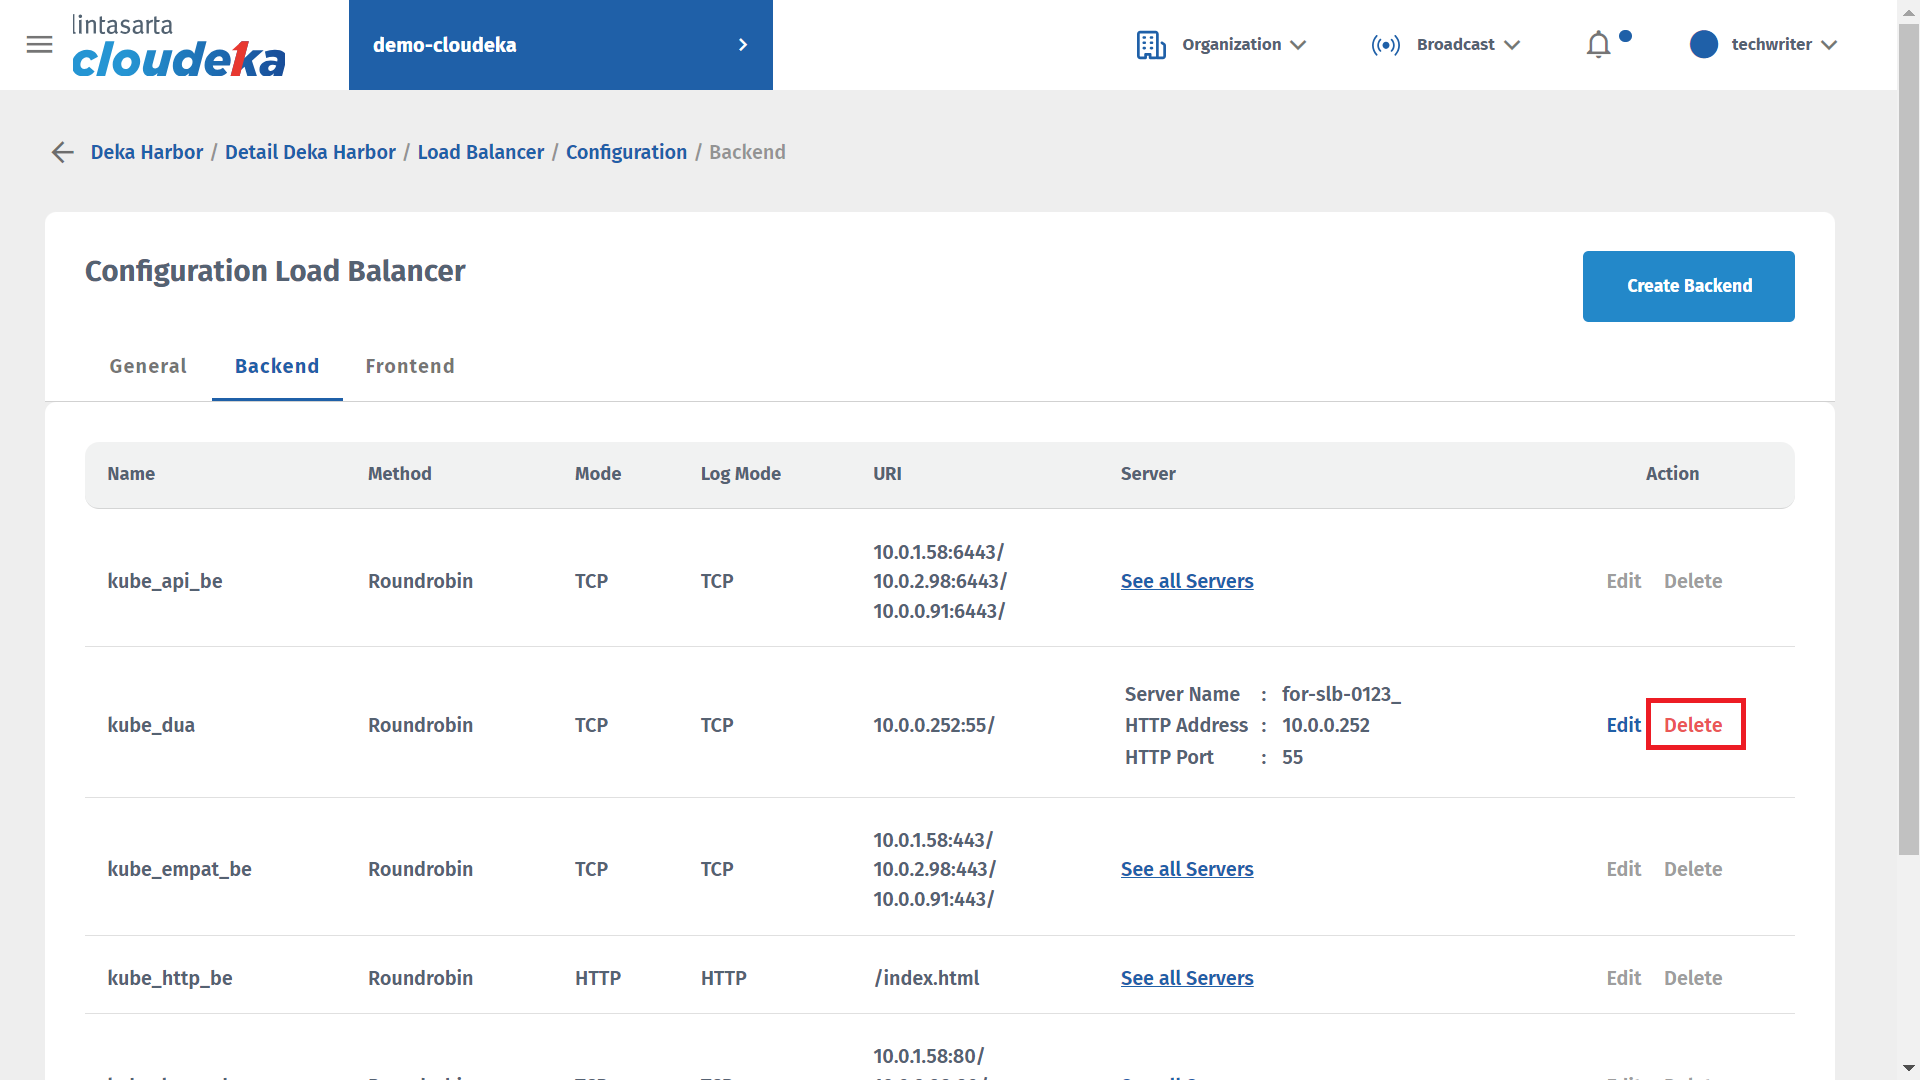
* The next step removes the Backend configuration. Select the Backend tab select the deleted Backend configuration by clicking the Delete button.

<figure><img src="https://putri.box.cloudeka.id/cloudeka-assets/static/images/20dekaharbor/20.37delbe.png" alt=""><figcaption><p>Delete Backend &#x26; Frontend (d)</p></figcaption></figure>

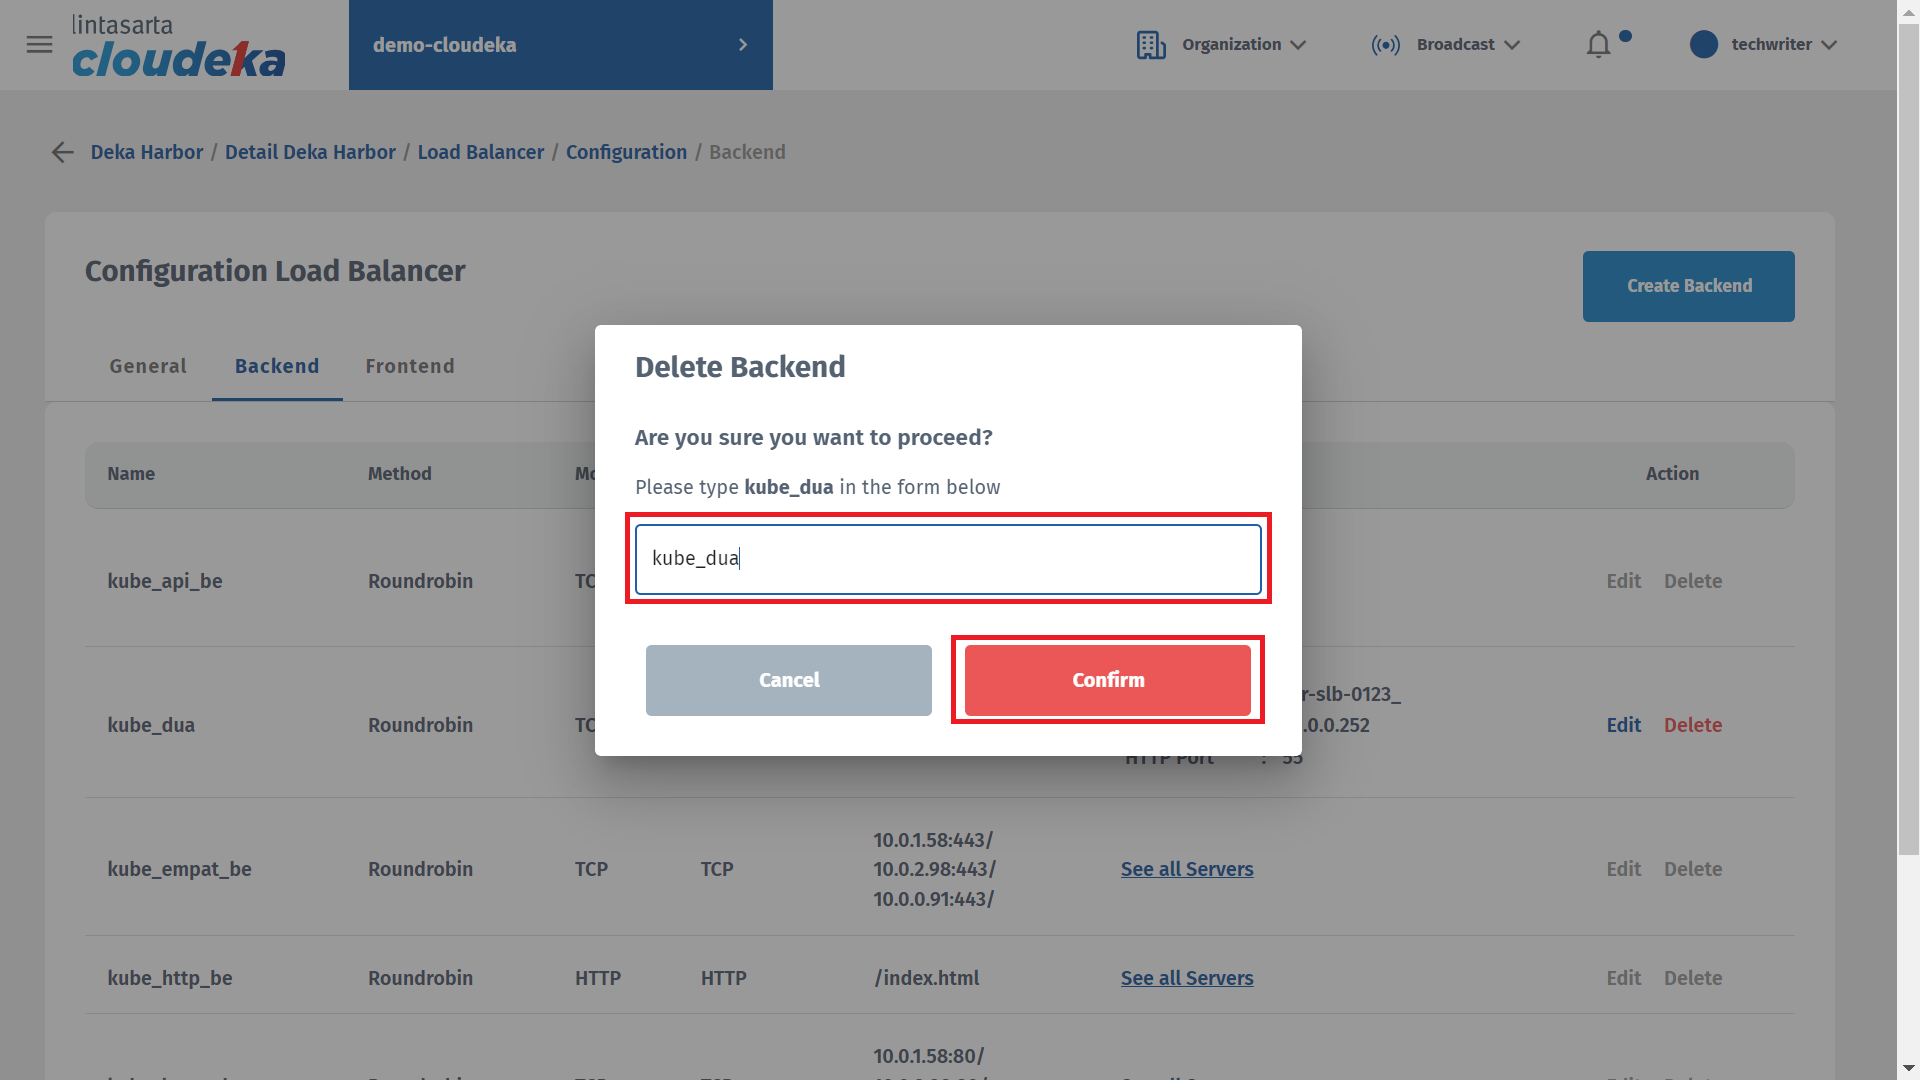
* The Delete Backend window displays enter the backend name and click the Confirm button.

<figure><img src="https://putri.box.cloudeka.id/cloudeka-assets/static/images/20dekaharbor/20.38delbackend.png" alt=""><figcaption><p>Delete Backend &#x26; Frontend (e)</p></figcaption></figure>

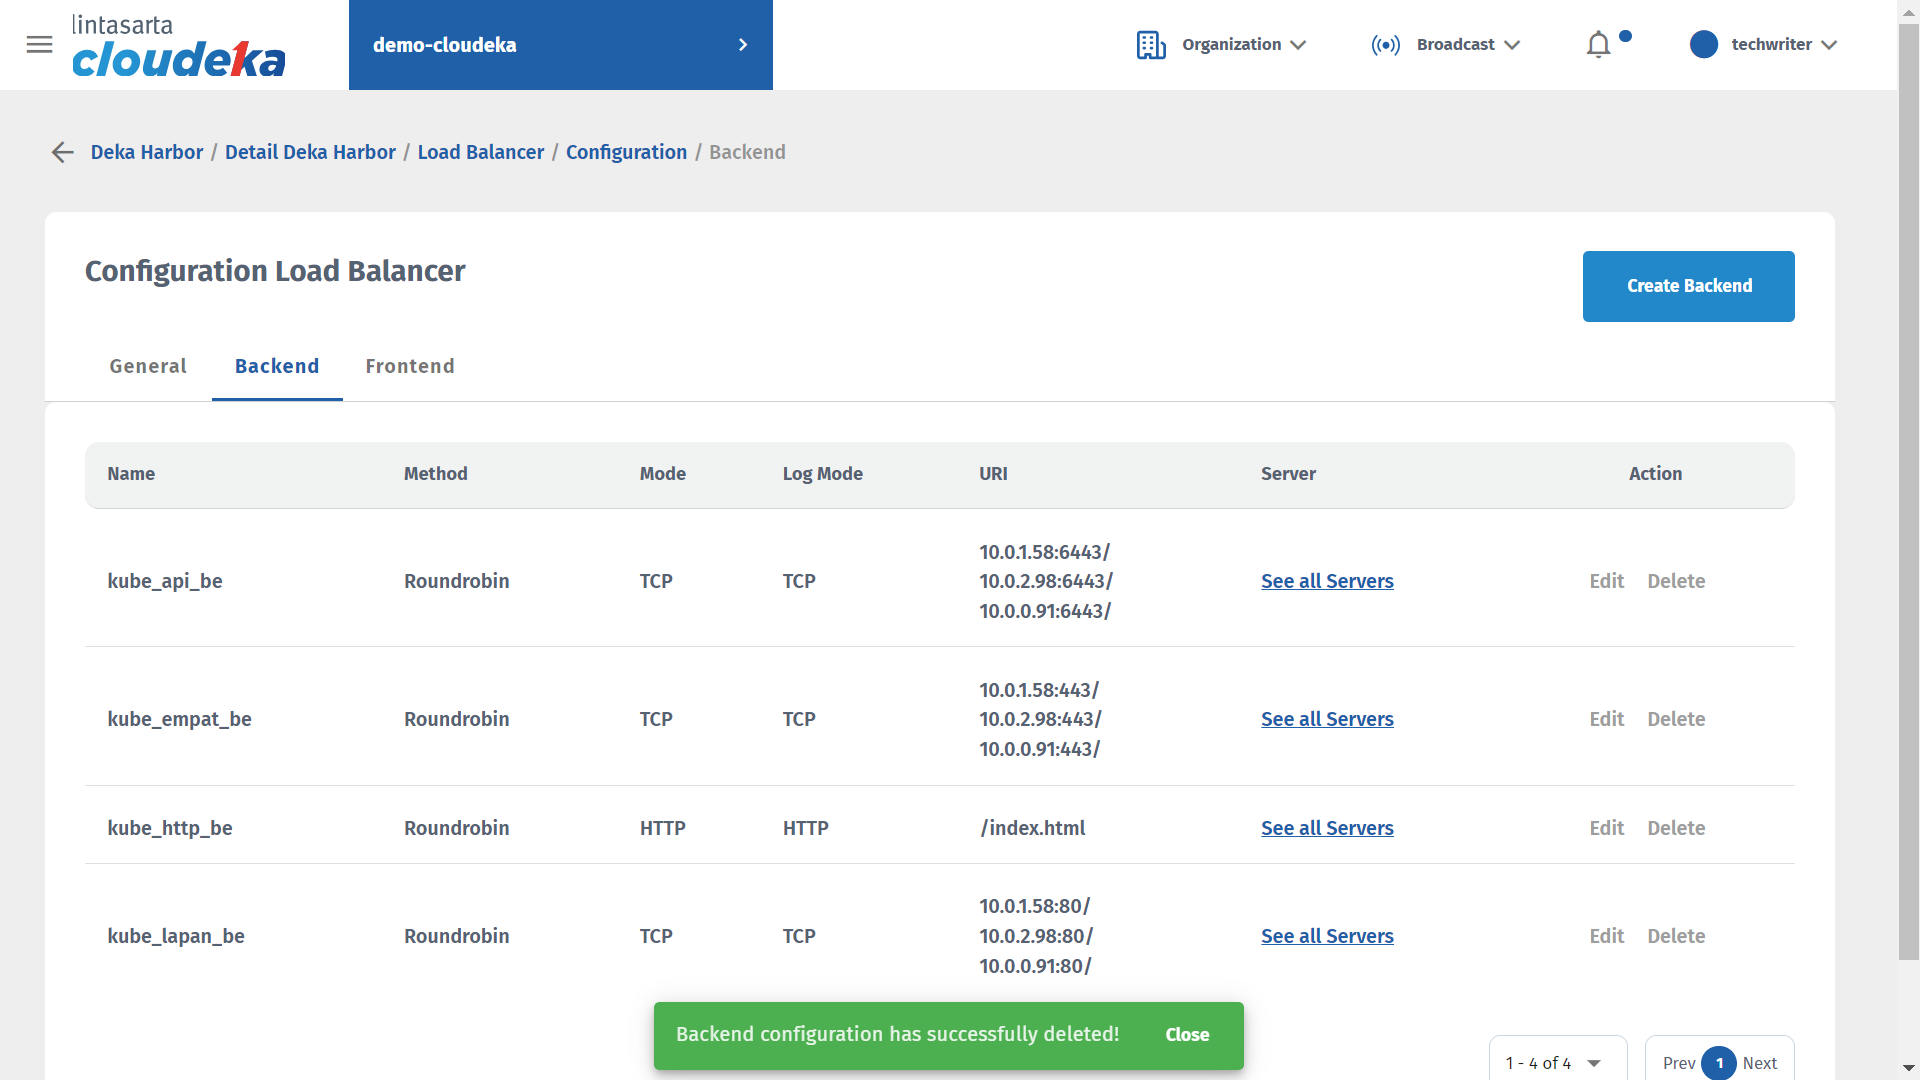
* The "Backend configuration has successfully deleted!" notification displays.

<figure><img src="https://putri.box.cloudeka.id/cloudeka-assets/static/images/20dekaharbor/20.39delback.png" alt=""><figcaption><p>Delete Backend &#x26; Frontend (f)</p></figcaption></figure>


---

# Agent Instructions: Querying This Documentation

If you need additional information that is not directly available in this page, you can query the documentation dynamically by asking a question.

Perform an HTTP GET request on the current page URL with the `ask` query parameter:

```
GET https://docs.cloudeka.id/platform/deka-harbor/configuration-load-balancer.md?ask=<question>
```

The question should be specific, self-contained, and written in natural language.
The response will contain a direct answer to the question and relevant excerpts and sources from the documentation.

Use this mechanism when the answer is not explicitly present in the current page, you need clarification or additional context, or you want to retrieve related documentation sections.